GENOME ユーザーズマニュアル
GENOMEユーザーズマニュアル
Two notes独自のCODEX、TSM™アンプ、DynIR™キャビネット、PEDALエンジンを搭載したアダプティブ・チャンネルストリップ
本マニュアルの電子版および関連するGENOMEソフトウェアアプリケーションは、予告なく更新されることがあります。
GENOMEの最新マニュアルをダウンロードするには、Two notes Audio Engineeringの全製品のユーザーガイドをご覧ください。 Two notes Audio Engineering
本マニュアルの電子版および関連するGENOMEソフトウェアアプリケーションは予告なく更新されることがあります。
GENOMEの最新マニュアルをダウンロードするには、Twonotes Audio Engineeringの全製品のユーザーガイドをご覧ください。
このマニュアルではTwo notesのプラグインアプリケーションGENOMEの使用方法、特徴、機能について説明しています。ソフトウェアを使用する前に必ずお読みください。 このマニュアルの内容は十分に検証されています。
本書の内容については万全を期しておりますが、万一ご不審な点や誤り、記載もれなどお気づきの点がありましたら、ご連絡くださいますようお願い申し上げます。本書の内容は、Two notes Audio Engineeringのウェブサイトからダウンロード可能な時点のものです。
Two notes Audio Engineeringは同社の登録商標です:
OROSYS SAS 76 rue de la Mine 34980 Saint-Gély-du-Fesc France
Tel: +33 (0)484 250 910 Fax: +33 (0)467 595 703
コンタクト&サポート: http://helpdesk.two-notes.com
製品開発のためOROSYS SAS は事前の通知なく技術仕様の変更、修正、生産中止の権利を有します。OROSYS SAS は偶発的であるか否かを問わず、本書の不適切な使用に起因する損害について責任を負いません。
GENOMEの不適切な使用に起因する損害について、OROSYS SASは責任を負いかねます。 本マニュアルに含まれる安全に関する指示を参照してください。をご参照ください。
本書のいかなる部分もOROSYS SAS の書面による許可なく複製することを禁じます。
すべての製品名および商標はそれぞれの所有者に帰属します。 製品名および本書に記載されている製品名および商標は、GENOME の開発中に使用されたものであり、いかなる意味においてもOROSYS SAS は一切関係ありません。
序文
1. 読者への警告
2. 正しいロードボックスの使い方
GENOMEはDIインストゥルメントフィードから供給されるリアルタイムまたはプリレコーディングされたオーディオで使用することができます、
ギター/ベースプリアンプ、ハードウェア・アンプシミュレーター(ReVolt Guitar、ReVolt Bass、OPUSを含む、)および/またはチューブ/ソリッドステートアンプと適切なロードボックス(Two notes社のTorpdoCaptor、Torpedo Captor X、Torpedo Reloadを含む)。 DIインストゥルメントフィードまたはプリアンプ/アンプのライン出力、アンプシミュレーターを使用するのは比較的安全で簡単です。真空管アンプのスピーカー出力をロードボックスと併用する場合は注意が必要です。
ロードボックスとは
真空管アンプを日常的に使用する場合、アンプのパワー出力は電源を入れる前に必ずスピーカーキャビネットか適切な負荷に接続してください。 スピーカーキャビネット(定格は 4 オーム、8 オーム、16 オームのいずれか) は、必ずアンプの対応するスピーカー出力に接続してください。
これを怠ると、真空管アンプの出力段が部分的、 あるいは完全に破壊されることがあります。
真空管アンプの設計者の大半は、ヒューズや適切な保護システムで製品を保護しています。
しかし、保護が不十分なアンプもあります。 したがって市販されているすべてのアンプについて、その負荷(スピーカーキャビネットであれ、ロードボックスであれ)の挙動を予測することは不可能です。
アンプに対するスピーカーキャビネットを表す電子用語は「負荷」です。
キャビネットがアンプに「負荷をかける」と言います。 ロードボックス “という用語は、アンプに負荷を与えるあらゆる製品を表すのに使われます。
ロードボックスの主なパラメータはインピーダンスで、単位はオームで表されます。 ロードボックスとアンプ間のインピーダンスのマッチングは最重要であり、可能な限り以下のように対処する必要があります。(例。8Ωのロードボックスは接続するアンプの8Ωのスピーカー出力に接続する必要があります)。
アンプから接続した負荷側に送られるパワー出力は熱に変わります。
各負荷側のマニュアルに記載されている冷却に関する推奨事項を参照することが重要です。
過熱はロードボックスとアンプの両方にダメージを与える可能性があります。
2.2 アンプの出力ボリュームの設定
ロードボックスを要するアンプを正しく使用するには注意が必要です。
ロードボックスとアンプを使用している間は無音であるため、誤ってアンプをメーカーが設定した妥当な範囲を超えて動作させてしまいがちです。アンプとスピーカーキャビネットを組み合わせて使用する場合よりも、さらにその傾向が強くなります。これは真空管の消耗を早め、場合によってはアンプやロードボックスの損傷につながります。
 |
大音量でアンプをテストするときは、真空管の色やアンプの全体的な状態を常に確認してください。 真空管が赤く光っていたり、煙が出ていたりする場合は問題の兆候です。アンプが部分的、あるいは完全に破壊される可能性があります。 |
パワーアンプのボリュームの最適なレベルである「スウィートスポット」と呼ばれる域は、最大ボリュームで得られないことほとんどない事を念頭に置いておいてください。
最大ボリュームで得られることは稀です。 さらにアンプのボリュームコントロールは通常、対数的です。つまり、ボリュームはポテンショメーターが回転する前半で急速に増加し、12時の位置で最大になります。従って、アンプの最大音量はたとえボリュームポテンショメーターが12時の位置であったとしてもボリュームポテンショメーターが最大値に設定されていなくても、アンプの最大音量に達することができます。
前述の出力ポテンショメーターが最大値に達するとかなりの歪みが聞こえます。
実際、ほとんどのアンプは最大音量では比較的貧弱な音になります。また、アンプは最大音量で長時間使用することを前提に設計されていないことを常に念頭に置いてください。アンプを大音量で鳴らすと、真空管が早期に摩耗し、故障の原因になります。
3. 推奨ソフトウェア動作環境
以下はGENOME を動作させるために推奨される最小要件の詳細です。
より多くのエフェクトブロックをインスタンス化するためには、システムスペックの改善/強化が必要になる場合があります。
GENOME は VST3, AU, AAX フォーマットで利用可能です。GENOMEを使用するにはデジタルオーディオワークステーション(DAW)が必要です。 GENOMEは以下のもので広範囲にテストされています。
-
Pro Tools
-
Apple Logic Pro X
-
Ableton Live
-
Steinberg Cubase
-
Studio One
-
Reaper
Windows 10 (64ビット) それ以降
-
Intel i5 or AMD 同等のマルチコア 64ビットプロセッサー
-
4GB RAM
-
OpenGL 2.0 compatible GPU
-
外部ASIO 互換オーディオハードウェアを強く推奨
macOS Catalina 10.15 それ以降
-
Intel i5 またはシリコンプロセッサー
-
4GB RAM
-
メタル 互換 GPU
-
外部 Core Audio 互換オーディオハードウェアを強く推奨
法的事項
以下の内容はTWO NOTES AUDIO ENGINEERINGのソフトウェアライセンスについてです。 こちらをよくお読みください。 本ソフトウェアの全部または一部をインストール、コピー、または使用することにより、お客様は本契約のすべての条項に同意したものとみなされます。
本契約のすべての条項に同意したものとみなされます。 条項に同意されない場合は、本ソフトウェアを使用しないでください、本契約書の条項に同意された場合、本書は以下の権利を行使するためのライセンス証明書となりますので、大切に保管してください。本ソフトウェアは本ソフトウェアの一部または全部を含む場合があります。 本ソフトウェアには製品のアクティベーションおよびその他の不正使用および不正コピーを防止するために設計された技術が含まれている場合があります。 この技術により、お客様のコンピュータがインターネットにアクセスすることがあります。
1. 定義
“TWO NOTES AUDIO ENGINEERING” は下記の登録商標です。
OROSYS
76, rue de la Mine
34980 SAINT-GELY-DU-FESC
FRANCE
Email: contact@orosys.fr
Phone number: +33 (0)4 84 25 09 10
「コンピューター」とは、(デジタル化された)情報をを受け入れ、プログラムまたは一連の命令に基づいて、何らかの結果を得るためにそれを操作する物理的または仮想的な装置を指します。
「ソフトウェア」とは本契約で提供されるすべての情報を指します。
これにはTWO NOTES AUDIO ENGINEERINGおよびサードパーティのソフトウェアファイル、ドキュメント、およびグラフィカルユーザーインターフェースのグラフィカル要素が含まれますが、これらに限定されません。
「RAM」とはランダムアクセスメモリのことです。コンピューターのプロセッサーが素早くアクセスできるようにするために、使用中のオペレーティングシステムやアプリケーションプログラム、データが保存される場所です。
「サーバー」とは同じコンピュータ、または他のコンピュータにあるクライアントプログラムからの要求を満たすために、サーバープログラムが実行されるコンピュータを指します。
「内部ネットワーク」とは従業員(臨時従業員を含む)および個人のみがアクセス可能な、私的かつ専有的なネットワークリソースを指します。内部ネットワーク」とは、特定の企業の従業員(臨時従業員を含む)および個人請負業者のみがアクセス可能な私的かつ専有的なネットワークリソースを指します。一般に公開されているインターネットおよび/またはその他のネットワークコミュニティは、「内部ネットワーク」の定義から除外されます。
2. ソフトウェアライセンス
2.1 一般使用
本ソフトウェアをOROSYS SASまたはその正規販売代理店から入手した場合、およびお客様が本契約の条項を遵守する限りお客様は本ソフトウェアを使用することができます。
お客様が本契約の条項に従う限り、OROSYS SASはお客様に対し本ソフトウェアの複製物を1台のコンピュータにインストールして使用するための非独占的ライセンスを許諾します。
「本ソフトウェアはコンピュータのRAMにロードされたとき、またはコンピュータのパーマネントメモリ(ハードディスク、CD-ROM、USBキーまたはその他の記憶装置を含みますが、これらに限定されません)にインストールされたときに「使用中」となります。他のコンピュータに配布することのみを目的としてインターナルネットワークサーバーにインストールされたコピーは、「使用中」ではありません。本ソフトウェアを使用する人数は、ライセンス数を超えてはなりません。
版権
OROSYS SAS およびその供給者は、本ソフトウェアのすべての知的財産権(特許、日付、秘密および秘密保持権を含みますが、これらに限定されません)を所有します。
本ソフトウェアの知的財産権はOROSYS SAS およびその供給者に帰属します。 本ソフトウェアは使用許諾されるものであり、販売されるものではありません。 OROSYSはお客様が本ソフトウェアの機能または知的財産を複製、使用、ダウンロード、インストールまたはその他の方法で享受することを許可します。
.
お客様は本ソフトウェアに付属するいかなる書面も複製してはなりません。 お客様はOROSYS SASまたは TWO NOTES AUDIO ENGINEERING の商標、ブランド名またはロゴをOROSYS SASの事前の書面による同意なしに使用しないことに同意するものとします。
デモンストレーション版ライセンス
ユーザーは14日間のTWO NOTES AUDIO ENGINEERING の/デモンストレーション版をアクティベート/ダウンロードすることができます。
アップグレードまたは更新
本ソフトウェアが旧バージョンのアップグレード版または更新版である場合、お客様は当該旧バージョンの有効なライセンスを取得しなければなりません。
アップグレードを使用することによりお客様は本ソフトウェアの旧バージョンを使用するライセンスを有しなくなることに同意するものとします。
アップグレードおよびアップデートは、OROSYS SAS により追加条件または異なる条件でお客様にライセンスされる場合があります。
制限および要件
本ソフトウェアの複製物には本ソフトウェア上または本ソフトウェアに表示されている著作権表示およびその他の所有権表示を付さなければなりません。 特にお客様は以下を行わないものとします:
・合法的なバックアップコピー以外に本ソフトウェアのコピーを作成すること。
・本ソフトウェアの起こりえる誤りを修正すること、または第三者によって修正させること。
・ウェブ上を含み、本ソフトウェアをレンタル、リース、貸与、販売、またはその他の方法で利用可能にすること。
・本ソフトウェアを、有償または無償を問わず、開示または配布すること。
・本ソフトウェアをリバースエンジニアリング、逆コンパイルまたは逆アセンブラすること。
・本ソフトウェアの論理的機能を再現すること、または本ソフトウェアの機能を理解可能な形式に変換すること。
・本ソフトウェアを翻案、変更、変形、修正すること。
・本ソフトウェアの機能を理解可能な形式に変換すること。
・本ソフトウェアを他の言語で転写もしくは翻訳すること、または本ソフトウェアを部分的にでも修正すること
・ 商標、ブランド、商号、ロゴ、著作権、およびOROSYS SASの特徴的な標識の変更、修正、移動または交換を行うこと。
・本ソフトウェアおよび/または関連文書を構成するあらゆる要素に含まれる、商標/ブランド名、ロゴ、 著作権および OROSYS SAS の特徴的な表示を変更または移動すること。
上記の権利はお客様が以下の条件を満たす場合に付与されます:
・本ソフトウェアが、関連文書に記載された仕様に従ったソフトウェアおよびハードウェア環境を提供すること。
・本ソフトウェアをインストール、複製、または使用するために、本ソフトウェアを第三者に譲渡およびまたは開示しないこと。
本ライセンス条項はライセンス契約時に有効な本ソフトウェアのバージョンおよび OROSYS SASが開発する新バージョンまたはアップデートを使用する権利以外のいかなる権利もお客様に付与しないことに同意するものとします。また、いかなる場合においても、本ソフトウェアのアップデートまたはバージョンを開発するかどうか、いつ開発するかについても、OROSYS SAS の単独の裁量に委ねられるものとし、その内容、時期、頻度についてはいかなる義務も負わないものとします。
あなたは本使用許諾契約書、本ソフトウェアおよび付属するすべての書面を譲渡し、複製物を保持せず、 かつ受領者が本契約の条項に同意することを条件として、本 OROSYS SAS 使用許諾契約に基づくお客様の権利を永続的に譲渡することができます。
3. 保証の制限
OROSYS SASは本ソフトウェアが関連文書に記載された仕様どおりに動作することを保証します、本保証には以下の保証が含まれます。
この保証には本ソフトウェアの引渡し(ダウンロードを含む)から 3カ月間、明白な欠陥および潜在的な欠陥に対する保証が含まれます。
本保証はOROSYS SAS が保証期間中に発生する可能性のあるエラーや故障を発見し、修正するために、合理的に可能なことを行うことを意味します。
本ソフトウェアの予期された使用を妨げる重大な故障につながり、かつ本ソフトウェアの固有のデフォルトに起因するブロックエラーに限られるものとします。
OROSYS SAS は明示または黙示を問わず、以下の保証を含むいかなる保証も明示的に排除します。
本書に記載されていない特定の目的への適合性、または本ハードウェア以外のデバイスへの適合性を含む、明示的または黙示的な保証は一切いたしません。
本ハードウェア以外の機器への適合性を含め、明示または黙示を問わず、いかなる保証も行わないものとします。 OROSYS SAS は、本ソフトウェアパッケージがお客様の個々の目的を満たすこと、および本ソフトウェア・パ ッケージがお客様の個々の目的を満たすことを保証するものではありません。
OROSYS SAS は本ソフトウェアパッケージがお客様の個々の目的を満足すること、および、本ソフトウェアが本 書に記載されたものと異なる組み合わせで動作することを保証するものではありません。
本ソフトウェアパッケージがお客様の個々の目的を満足すること、または、本ソフトウェアが本書に記載され たものと異なる組み合わせで動作すること、中断または停止することなく動作することを保証しません。
以下の場合(ただしこれに限定されない)保証は適用されず、OROSYS SAS はいかなる責任も負わないものとします。
・ 一度も改造されていないこと。
・ 正しくインストールされていない場合。
・ 悪用したり、推奨された使用方法と異なる方法で使用していないこと。
・本規約に基づき、複数回の補償要求または不正取得が行われていないこと。
・ TWO NOTESが明示的に許可していない第三者の介入を受けていないこと。
4. 責任の制限
上記の OROSYS SAS が提供する唯一の救済措置、および法律により除外または制限できない救済措置を除きOROSYS SAS、その関連会社、供給業者、または認証局は法律により除外または制限される場合を除き、以下の責任を負いません。また、OROSYS SASその関連会社、サプライヤー、または認証局は派生的損害、間接的損害、偶発的損害、逸失利益偶発的な損害、利益の損失、貯蓄の損失、ビジネス情報の損失、その他の金銭的損失、また、事業中断、人身傷害、または注意義務の不履行に起因する損害、あるいは当局による請求も含め、いかなる損失、損害、請求、費用に対しても責任を負いません。または第三者による請求に起因する損害は、たとえ OROSYS SAS の代表者がそのような損失、損害の可能性を知らされていたとしても、この限りではありません。いかなる場合においても、OROSYS SAS の総責任およびその関連会社の責任はOROSYS SAS に帰属します。またその責任は本ソフトウェアの対価として支払われた金額を上限とします。本契約の基本条件または重要条件の違反があった場合にも適用されます。上記の制限および排除は、以下の場合に適用されます。お客様は消費者保護法およびその他の法律に基づき放棄できない権利を有する場合があります。OROSYS SAS は、法律で認められていない範囲において、お客様の保証または救済を制限しようとするものではありません。法律で認められていない範囲まで、お客様の保証または救済を制限しようとするものではありません。
5. 一般条項
お客様が本ソフトウェアを業務目的以外の個人的な目的にのみ使用する消費者である場合、本契約はお客様が本ソフトウェアを使用するためのライセンスを購入した国の法律に準拠するものとします。お客様がそのような消費者でない場合、本契約の解釈および執行可能性については、フランス法が適用されるものとします。本契約の一部が無効かつ執行不能と判断された場合であっても、本契約の残りの部分の有効性には影響しません。本契約は権限を与えられたOROSYS SASの役員が署名した書面でのみ変更することができます。
OROSYS SAS の役員によって署名された書面によってのみ変更することができます。お客様とOROSYS SAS が署名した特定の書面による合意がない場合、本契約が唯一かつ完全なものとなります。本契約は、本ソフトウェアに関するお客様と OROSYS SAS との間の唯一かつ完全な合意であるものとします。本契約は本ソフトウェアに関する他のいかなる使用許諾契約 (ユーザーズマニュアルに記載された契約、事前の表明、協議、約束、契約、その他を含みますが、これらに限定されません。本ソフトウェアに関する他のいかなるライセンス契約にも明示的に優先し、取って代わります。ただし、本ソフトウェアに関する後発の契約が書面によりお客様とOROSYS SAS の正式な担当者の双方によって署名された場合はこの限りではありません。
6. サポート
OROSYS SASはいかなる情報、ソフトウェア、技術情報、ノウハウまたはサポートを提供する義務を負わないものとします。 OROSYS SASは本ソフトウェアを変更する権利を留保します、および本契約に基づき提供されるすべての資料を予告なく変更する権利を有します。
ジノムについて
キャリアクラスのソフトウェアエコシステム、GENOMEをご紹介します。アンプ、ペダル、クラスをリードするバーチャルキャビネット、そして必要不可欠なSTUDIO FXを融合させたGENOMEは、究極のインザボックスまたはハイブリッドバックラインを実現するための最初で最後の目的地です。
GENOMEのハイライト
-
キャリアクラスのエンドツーエンドのギター/ベース・トーンシェイピング・エコシステム
-
インザボックスとハイブリッドの両方のリグ用に専門的に設計され、超リアルなアンプ、ペダル、キャビネットのエミュレーションにより、あらゆるアンプ、プリアンプ、DIのトーンを向上させます。
-
直感的でギター中心のインターフェイスにより、ダイヤルし完璧なトーンに集中できます。
-
AIが生成したアンプ&ペダル・モデルをリアルタイムで再生するCODEX Unification Engine、Neural Amp Modeller (NAM)、AIDA-X、Proteusキャプチャと互換性あり。クリエイティブなポテンシャルを即座に引き出すために、専門家がキュレーションした40以上のキャプチャーが含まれています。
-
チューブ・ステージ・モデリング(TSM™)エンジン:12種類のプリアンプモデル、4種類の真空管パワーアンプモデル (6L6、EL34、EL84、KT88)、5極管/3極管、プッシュプル(PP)「クラスAB」、シングルエンド(SE)クラスA」構成
-
オーバードライブ、ディストーション、ディレイの豊富なライブラリを搭載した超リアルなPEDALエンジン、モジュレーションPEDALS
STUDIO Compressor、STUDIO EQ(パラメトリック)を含む包括的なSTUDIO FX STUDIOディレイ、STUDIOリバーブなど -
クラスをリードするDynIR Engine™ 600以上のバーチャルギター/ベースキャビネット、スタジオグレードのマイクとレコーディングスタジオ環境備えています。
-
オプションのデュアルレーンにより、並列処理が容易に
-
5 DynIR™ Captures、40 Microphones、17 PEDALS、12 TSM™ Amplifiers、17 STUDIO FX、50以上のAIアンプキャプチャー、専門家が監修したRIGライブラリーで、クリエイティブな可能性を即座に実現出来ます!
-
VST3, AU, AAXフォーマットでMacOS XとWindows(64ビットと32ビット)に対応
ライセンス
GENOMEを使用するには有効なTwo notesユーザーアカウントを使用/作成する必要があります。初回起動時GENOMEはソフトウェアのすべての機能と特徴を使用するために、ユーザーがTwonotesアカウントの認証情報をを使用してアプリケーションにログインするよう要求されます。 新規のお客様はユーザーアカウントを作成することができます。 Two notes website GENOMEアプリケーションをインストール後に初めて起動する際に使用します。 本ソフトウェアの使用は以下の条件に従います。 terms and conditions
1. 無料トライアル
お客様がTwo notesのユーザーアカウントをお持ちで、GENOMEのライセンスをお持ちでない場合、アプリケーションを起動/ログインすると、14日間の無料評価ライセンスが開始されます。
14日間の無料評価ライセンスが開始されます。 この無料14日間無料トライアルライセンスには、5つのDynIR™キャプチャー、17のPEDALS、12のTSM™アンプ、17のSTUDIO FX、50以上のAIアンプキャプチャーが含まれています。
GENOMEの14日間トライアルを開始する前に、対象となるユーザーはアカウント認証情報を挿入するか、GENOMEアプリケーションで直接設定できるTwo notesアカウントを設定する必要があります。
14日間の試用期間が終了すると、アプリケーションへのログインは停止されユーザーは、GENOMEの有効なライセンスを取得するために、Two notesのウェブサイトに誘導されます。 試用期間中、購入可能なコンポーネントがカートに追加された場合、GENOMEのライセンスが必要となり自動的にカートに追加されます。
2. DynIR™ とプレミアムコンポーネントライセンス
GENOMEのライセンスを取得した後、GENOME内でキャビネットを購入し、デモを行うことでDynIR™バーチャルキャビネットライブラリーを拡張することができます。
GENOME 内でキャビネットを購入してデモを行い、その後 Two notes のウェブサイトから購入することで、DynIR™ バーチャルキャビネットライブラリを拡張することができます。
購入したキャビネットは注文が完了するとライセンスにアップロードされます。 ライセンスを提供する購入したDynIR™のライセンスがある場合、GENOMEアプリケーションを再開するとDynIR™バーチャルキャビネットがホストマシンにダウンロードされます。
GENOMEエコシステム内で無制限に使用できます。 購入したDynIR™バーチャルキャビネットは、販売、換金、他のユーザーへの譲渡はできません。
Two notesハードウェア製品の登録、アクティベーションコード、またはTwo notesのプロモーションを通じてDynIR™と交換された場合はご注意ください。
アクティベーションコード、またはTwo notesのプロモーション等によって交換されたDynIR™はGENOMEでも使用できます。
DynIR™の詳細とTwo notesのDynIR™カタログはこちらをご覧ください here.
購入可能なすべてのプレミアムコンポーネントとコンポーネントパックをご覧になるには、以下をクリックしてください。https://www.two-notes.com/en/get-more-amps-pedals-studio-fx-for-genome/ here.
GENOMEのインストール
GENOMEのインストーラーをダウンロードしてください。 https://www.two-notes.com/en/downloads/. インストーラはインストールプロセスを案内し、プラグインのすべてのフォーマットを関連するフォルダにインストールします。
3. GENOMEアクティベーション
ユーザが有効なTwo notes ユーザアカウントと GENOMEのフルライセンスを持っている場合GENOMEは起動時にアクティベートされます。起動時にアプリケーションへのログインに成功すると起動します。 ユーザーがTwo notesユーザーアカウントまたはGENOMEのフルライセンスをお持ちでない場合は、以下のリンクを参照してください:
2. レイテンシー
レイテンシーとは?
レイテンシーという用語はオーディオ制作の世界では一般的なもので、音声が典型的なスタジオのセットアップの中で、変換や処理の様々な段階を通過するのにかかる時間のことです。制作機材のレイテンシーに影響を与える要因はたくさんあり以下のようなものがあります。
-
オーディオ(またはMIDI)信号がインターフェースやコンピュータに送られるまでの時間
-
オーディオインターフェイスが入力音声のアナログからデジタルへの変換を処理するのにかかる時間
-
DAW内部でのオーディオ処理にかかる時間
-
インターフェイスがデジタルからアナログに変換が行われ、ヘッドフォンやモニターから聞こえるようになるまでの時間
オーディオレコーディングやプロセッシングのセットアップを行う際に、レイテンシーを考慮することは非常に重要です。そのためには演奏と処理されたオーディオの間の衰え、遅れを最小にする事です。GENOMEを使用する際にオーディオのレイテンシーを可能な限り低く設定することが重要です。
GENOME プラグイン バリエーション
1. 対応DAW、プラグインフォーマット、推奨システムスペック
GENOMEは以下のプラグインフォーマットで提供されており、主要なデジタルオーディオワークステーション(DAW)プラットフォームと互換性があります::
-
VST3 ( Cubase, Studio One, Ableton Live, and Reaper)
-
AU (Logic and Garage Band)
-
AAX (ProTools)
2. GENOMEプラグインバリエーションによるレイテンシーとオーディオインターフェイスのセットアップ
-
まず始めにギターまたはベースを互換性のあるオーディオインターフェースに接続し、Hi-Zスイッチをオンにして、インストゥルメントレベルの入力用にインターフェースを最適化します。
-
次にDAWを開きAudio Preferencesに移動します。
-
GENOMEを使用する際、演奏中にポップ音やクリック音が発生する場合は、これらの望ましくないアーティファクトが聞こえなくなるで、このバッファー/レイテンシーの設定を上げる必要があります。すべての主流DAWにおけるオーディオ環境設定のガイドについては、以下のナレッジベース記事を参照してください
-
最後にお使いのインターフェイスがゼロレイテンシーモニタリングオプションを備えている場合、GENOMEで処理された信号とDI信号が同時に聞こえるのを避けるため、このオプションが無効になっていることを確認してください。
GENOMEスタンドアロンアプリケーション
1. GENOMEのスタンドアロンアプリケーションによるレイテンシーとオーディオインターフェースのセットアップ
・次にアプリケーションのハンバーガーメニューにある 「Audio Settings 」メニュー項目をクリックして、スタンドアロンアプリケーションの
・Windowsユーザーの場合のみ、「Audio Device Type 」ドロップダウンメニューで、ASIOを選択します。
・次にホストコンピューターに接続されているオーディオインターフェースに対応する 「Input Device 」と 「Output Device 」を選択します。
・Active Inputs” 区画で楽器が接続されているオーディオインターフェースの入力を選択します。
・Active Outputs “区画でGENOMEで処理されたサウンドをモニターやヘッドフォンで聴くために、オーディオインターフェースの関連する
・最後に 「Sample Rate 」ドロップダウンメニューを使ってスタンドアローンアプリケーションのサンプルレートを設定し、「Audio Buffer Size 」
・注意:特定のサンプルレート設定が必要な場合を除き、サンプルレート設定を48000Hzに設定することをお勧めします。
・注意:サンプルレートとバッファサイズを上げると、ホストマシンの仕様によっては、不要なオーディオアーティファクトやレイテンシーが
2. GENOME のプラグインバリエーションとスタンドアロンアプリケーションの核となる相違点
GENOME のプラグインバリエーションとスタンドアロンアプリケーションの主な違いは以下の通りです:
-
スタンドアロンアプリケーションにはハンバーガーメニューからアクセスできる専用の 「Audio Settings 」メニューがあります。
-
スタンドアロンアプリケーションには専用の 「MIDI Settings 」メニューがあり、ハンバーガーメニューからアクセスできます。
-
スタンドアロンアプリケーションはアプリケーションを再び開いたときに、最後に保存したまたは保存していないインスタンスを保持します。
MIDI
v1.6以降、GENOMEはプログラムチェンジ(PC)とコントロールチェンジ(CC)メッセージの両方をサポートする包括的なMIDIマッピング機能を提供します。デフォルトではPCメッセージはインスタンス化されたバンクのRIG(0~127)に自動的に割り当てられます;
一方、CCメッセージは割り当て可能なアーキテクチャーまたはコンポーネントレベルのパラメーターにユーザーが手動で割り当てるためのものです。また、MIDIにアサインされたRIGプリセットは、RIGブラウザーのRIGスロットの右上にある緑のドットで識別されます。
注:PCメッセージはVST3仕様でサポートされていますが、現時点では多くのDAW(Reaper、Ableton Live、Studio Oneを含む)では正しく実装されていません。そのためGENOMEのプラグインバリアントでPCコマンドを使用してRIGを切り替えたい場合は、AUまたはAAXバリアントを推奨します。
1. MIDIアサインメントの作成
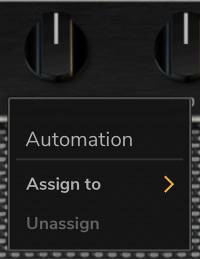
GENOMEではMIDIマッピングセンター内のマトリックス、またはオートメーション可能なコンポーネントまたはアーキテクチャパラメータを右クリックして、2つの方法でMIDIを割り当てることができます。
1.1 右クリックのコンテキストメニューでMIDIアサインを管理する。
アーキテクチャパラメータ
GENOMEではアーキテクチャーパラメーターはどのGENOMEインスタンスをロードしても一貫しています。そのため、MIDIマッピングセンター内に永続的にリストされ、割り当てを削除する機能はありません。アーキテクチャーパラメーターをMIDI CC値にマッピングするには:
-
最初にRIG ブラウザで指定されたコンポーネントレベルのパラメータまたは RIG を右クリックしてアサインします。
-
LEARN “を使用すると、入力されるMIDI信号をモニターし、最初に有効なCCコマンドを選択したパラメーターに自動的に割り当てます。
-
またはデフォルトで 「OFF 」と表示されているフィールドをクリックして、手動でCCパラメータを設定します。
コンポーネントレベルのパラメータ
アーキテクチャーパラメーターとは異なり、コンポーネントレベルのコントロールはRIG固有のもので、マニュアルアサイン作成、CCアサイン、MIDIラーニング機能、CCクリアオプション、アサイン削除機能が可能です。 コンポーネントレベルのパラメーターをMIDI CC値にマッピングする:
-
最初に右クリックし、指定されたパラメータを割り当てます。
-
CREATE “をクリックすると、パラメータがセレクテッド・アサインメントとして追加されます。セレクテッド・アサインメントを作成すると、パラメータがMIDI Mapping Centreに追加されることに注意してください。一度作成したMIDIアサインメントは、すぐに実行するか(以下の手順で説明するプロセスを使用)、選択したすべてのアサインメントを1つの便利なワークスペースでマッピングできるMIDIマッピングセンターに入るまで延期することができます。
-
LEARN “を使用すると、入力されるMIDI信号をモニターし、最初に有効なCCコマンドを選択したパラメーターに自動的に割り当てます。
-
または、手動でCCパラメータを設定し、デフォルトでは 「OFF 」と表示されているフィールドをクリックします。
-
MIDIアサインを削除するには、CCアサインクリアボタンの隣にあるXボタンをクリックします。
-
注意:「Delete a MIDI Assignment」(MIDIアサインメントを削除)オプションは、コンポネントレベルのパラメータが以前にアサインされている場合にのみ表示されます(以前にMIDI CCコマンドにアサインされ、CCコマンドがクリアされたパラメータ、またはアサイン用に選択されたがCCコマンドにアサインされていないコンポネントパラメータのいずれか)。したがって、このパラメーターをクリックすると、GENOMEのMIDIマッピング・センター・マトリックスからアサインが完全に削除されますが、そのようなアクションが誤って行われた場合は、いつでも再度追加することができます。
1.2 MIDIマッピングセンターでMIDIアサインを管理する。
MIDI マッピングセンターは GENOME のハンバーガーメニューからアクセスします。このサブメニューでは、GENOMEインスタンス内のすべてのMIDI割り当てを管理するための包括的な機能を利用できます:
-
すべての固定アーキテクチャーパラメーターMIDIアサインの管理
-
作成されたすべてのコンポネントレベルパラメーター(アサインされたもの、またはMIDIアサインが意図されたもの)の管理
-
選択した建築レベルまたはコンポーネントレベルのパラメーターに、マニュアルまたはMIDIラーニング経由でCCをアサインします。
インスタンス対RIG MIDIマッピング管理
MIDI Mapping Centre内のInstance Mappingsは、GENOMEにロードされたRIG間で一貫性を保つアーキテクチャパラメーターで、GENOMEのMIDI Mapping Centreウィンドウの左側の列に表示されます。この列では以下のインポート、エクスポート、およびデフォルトの動作オプションが利用可能です:
-
IMPORT MAPPING: 現在のGENOMEインスタンス内に、以前に保存したMIDIマッピング・テンプレートをインポートするために使用します。
-
EXPORT MAPPING:これを使用して MIDI マッピングテンプレートをホストマシンに保存し、前述の IMPORT MAPPING 機能で呼び出すことができます。複数のGENOMEインスタンスに同じアーキテクチャのMIDIマップを適用したり、異なるコントロールソースを使用する際にアーキテクチャのMIDIマップを切り替えたりするのに便利な機能です。
-
SET AS DEFAULT: 現在のMIDIマップを起動時のGENOMEのデフォルトコントロールマップとして設定する。
-
LOAD DEFAULT:現在のアーキテクチャー MIDI マップをデフォルトアサインで上書きします(「SET AS DEFAULT」 が以前に選択されていない場合は工場出荷時の設定、ま たはユーザーがデフォルト状態として最後に選択した マップのいずれか)。
RIG Mappings は MIDI Mapping Centre の右側の列にあり、現在インスタンス化されている RIG と GENOME インスタンス内の関連コンポーネントに関連します。RIG マッピングは RIG ファイルと一緒に保存され、GENOME インスタンス間で利用可能です。さらにRIGマッピングを追加するには、上記のガイドライン「i. 右クリックコンテクストメニュー / コンポーネントレベルパラメーターを使ったMIDIアサインメントの管理」を参照してください。
MIDIマッピングセンターでMIDI割り当てを管理する。
MIDI Mapping Centre内では、GENOMEインスタンスまたはRIGレベルでのMIDI割り当てを管理するために、以下のコントロールが利用可能です:RIGレベルバッチコントロール
-
すべての MIDI CC 割り当てを一括でクリアします: インスタンスまたは RIG マッピングのすべての MIDI アサインをクリアするには、”Instance: Software”, “Instance: Instance:Software”, “Instance:Automations”, “Instance: Lane Mixer” または “RIG”
テーブルの上部にあるCCボタンをクリックします。 -
すべての MIDI CC 割り当てを削除する(RIG のみ): 現在アクティブなRIGマッピングのすべてのMIDIアサインを削除するには、RIGテーブルの上部にあるXボタンをクリックします。
各パラメーターのMIDIアサインメント:
-
LEARN: LEARNを使用すると入力されるMIDI信号をモニターし、最初に有効なCCコマンドを選択したパラメーターに自動的に割り当てます。
-
注:PCメッセージはインスタンス化されたバンクのRIGチェンジにロックされます。このステータスは南京錠アイコンで表示されます(下図参照);Rig Change “このステータスは、南京錠アイコンで表示されます(下図参照);
Rig Change “行の右端にあるCCボタンセレクタをクリックすると、RIG変更にCC番号を割り当てることができます(値は1~127)。
-
-
CC Indicator & Entry Field: デフォルトでは(アクティブなアサインがない場合)、このフィールドは 「OFF 」と表示され、「LEARN 」パラメータの右にあります;このフィールドをクリックすることで、どのMIDI CCがどのパラメーターにアサインされているかが、手動でCCアサインを設定するオプションとともに表示されます。
-
注:割り当て時、そして選択されたCC値が現在のコンフィギュレーション内ですでに使用されている場合。 重複したCCアサインメントの左側に(i)アイコンが表示されます。この(i)アイコンをクリックすると、関連するCCコマン ドに割り当てられたパラメーター名がダイアログボックスに表 示され、同じCC番号の複数の割り当てを許可するか(「OK」)、ま たは重複する割り当てを消去するか(「CLEAR DUPLICATE ASSIGNMENTS」)を選択できます。
-
-
Parameter Name: Clear MIDI CC Assignment “アイコンの右側に、MIDIアサイン用のパラメータ名が表示されます。
-
Assignment Behavior: Parameter Name “フィールドの右側には、GENOME の MIDI アサインビヘイビアコントロールがあります;
これらはGENOMEが与えられたMIDIメッセージにどのように反応するかのカスタマイズオプションを提供します。GENOME 内では、アサインされたパラメーターは以下のように分類されます:-
Dual State Parameters: デュアルステートパラメーターとは、2つの状態(オン/オフ)のみを持つパラメーターのことで、PEDAL コンポーネントのスイッチのオン/オフ状態が良い例です。GENOME 内ではこのような割り当ての動作を設定するために、以下のオプションが利用可能です:
-
Toggle (0 = “off” / 1-127 = “on”)
-
Reverse (0 = “on” / 1-127 = “off”)
-
Any (0-127 = change state)
-
-
Scaled Parameters: デュアルステートパラメーターとは対照的に、スケールパラメーターは、割り当てられたMIDI CC値(0~127)によって値の範囲をインスタンス化できるパラメーターです。GENOME、
オプションで、0から100までの 「Min 」と 「Max 」の値を設定できます;
これは基本的にMIDI コントローラーがパラメータをコントロールする範囲を指定します。 GENOME、オプションで、0から100までの 「Min 」と 「Max 」の値を設定できます;これは基本的に、MIDI コントローラーがパラメータをコントロールする範囲を指定します。-
注:この範囲制約はGENOMEのコントロールに適用され、関連するCCメッセージ値には適用されない。
-
-
-
Delete MIDI CC Assignment (RIG Only): 現在アクティブなRIGマッピング内の特定のMIDIアサインを削除するには、”Assignment Behavior “フィールドの右にあるXボタンをクリックします。
1.3 MIDIデバイスページ(スタンドアロンアプリケーションのみ)
スタンドアロンアプリケーションのみを使用する場合、GENOMEのハンバーガーメニューからMIDIデバイス・ページという追加の設定ページを利用できます。Thisスタンドアロンアプリケーションのみを使用する場合、GENOMEのハンバーガーメニューからMIDIデバイスページという追加の設定ページを利用できます。注:GENOMEのプラグインのバリエーションでは、MIDIデータがどのように受信されるかを決定するセットアップオプションはホストDAWの環境設定内の関連するMIDIセットアップ機能を介して設定されます。ホストDAW内でのMIDIデバイスの設定方法の詳細については以下のリンクにある関連DAWユーザーガイドを参照してください:
MIDI Devices ページではGENOME をスタンドアロンアプリケーションとしてどのように MIDI 情報を受信するか設定するために、以下のコントロールを利用可能です:
-
MIDI Channel (ドロップダウンメニュー):MIDIデータを受信するチャンネルを選択 – チャンネル1-16、または全チャンネル(OMNI)経由のいずれか
-
MIDI Inputs: ホストコンピュータに接続された互換性のあるハードウェアから、GENOME スタンドアロンアプリケーション内でどの外部デバイスから MIDI データを受信するかを設定します。
使用例
1. エンドトゥーエンド・トーンシェイピング
このセットアップシナリオではGENOMEはギターまたはベース信号のすべてのトーンシェイピングを処理するように設定されます。GENOME以外の周辺ハードウェアやソフトウェアは、音色を根本的に変化させるものであることにご注意ください。
トーンに影響を与えるGENOME以外のハードウェアやソフトウェアは、このセットアップ構成では使用しないでください。周辺ハードウェアをGENOMEのシグナルチェーンに組み込む場合は、”使用例 / ハイブリッドリグ “をご参照ください “Use Cases / Hybrid Rig”
出発点としてDAWとオーディオインターフェイスが「セクション4 レイテンシーとオーディオインターフェイスのセットアップ / インターフェイスの設定」に記載されている全体的な手順に従って設定されていることを確認してください。 “Section F: Latency”
このセットアップ構成に必要なもの
-
インストゥルメント/High-Zインプットを備えた互換性のあるオーディオインターフェース
-
モニタリングソース(ヘッドフォンまたはスタジオモニター)、およびモニタリングソースとオーディオインターフェイスを接続するための適切なケーブル。
-
1/4インチTSアンバランス楽器ケーブル
-
ギターまたはベース
-
GENOMEをインスタンス化できるデジタルオーディオワークステーション(DAW)
オーディオインターフェースとDAW/スタンドアローンアプリケーショ ンを設定した後、GENOMEをインザボックスリグとしてセットアップし、以下のガ イドラインに従ってギターやベースのトーンをエンドトゥエンドでシェーピング してください:
-
スタンドアロンアプリケーションを使用する場合は単にアプリケーションを開き、ソースからのオーディオがGENOMEに受信されていることを確認します。
-
DAWを使用する場合:
-
DAWに新しいオーディオチャンネルをロードする
チャンネルのインサートでプラグインリストを開き、GENOMEを選択する。-
初めて GENOME をインスタンス化する場合、GENOME にログインするよう促されます、この操作を行うにはTwo notesアカウントの認証情報を使用してください。
- チャンネルのインサートでプラグインリストを開き、GENOMEを選択する。
-
正しいアカウント情報が入力されると、GENOMEが起動し、以下のような画面が表示されます。レーンベースのアーキテクチャとコンポーネントにアクセスできるようになり、インザボックスリグを始めれるようになります。
-
-
エンドトゥエンドのトーン生成には、アンプモデル(CODEXまたはTSM™アンプ)と適切なキャビネットエミュレーション(DynIR™エンジンまたはIR Loader)が選択されていることを確認してください。トーンをさらに補正し、洗練させるにはSTUDIO FXを追加してください(ポストアンプまたはキャビネットエミュレーション)。とPEDALコンポーネント(プリアンプエミュレーション)をGENOME RIGに追加してください。
注意:ステレオ入力ソースがあり、GENOME をステレオオーディオチャンネルにロードした場合、GENOME はデフォルトで左右のチャンネルを合計してモノラル信号ソースにします。
GENOMEウィンドウの左上隅にある入力設定オプションをクリックすると、デフォルトの合計を継続するか、ステレオ信号の左または右チャンネルからモノフィードを取るかを選択できます。
2. ハイブリッドリグ
ハイブリッドリグとは従来のバックライン(モデリングプロセッサー、アンプ、ペダルボード、ハードウェアアンプシュミなど)と、GENOMEのPEDALS、CODEX AIアンプキャプチャー、TSM™アンプ、DynIR™ / IRキャビネット、STUDIO FXを組み合わせたセットアップのことです。 以下のセットアップシナリオでは、GENOMEをバックラインに組み込むための主な使用例を取り上げています。
出発点としてDAW/スタンドアロンアプリケーションとオーディオインターフェイスが、以下に記した全体的な手順に従って設定されていることを確認してください。 “Section F: Latency”
このセットアップ構成に必要なもの
-
インストゥルメント/High-Zインプットを備えた互換性のあるオーディオインターフェース
-
モニタリングソース(ヘッドフォンまたはスタジオモニター)と、モニタリングソースをオーディオインターフェースに接続するための適切なケーブル配線
-
ペダル/ペダルボード、DIボックス、アンプ、ロードボックス、モデリングプロセッサー、ハードウェアアンプ・シミュレーターなど(ただし、これらに限定されない)。
-
Loadbox、アンプシュミ、ペダルボードとオーディオインターフェイスを接続するのに適したケーブル(ケーブルと接続の要件については、各メーカーのユーザーガイドを参照してください。)
-
ギターまたはベース
-
プラグイン専用: GENOME をインスタンス化できるデジタルオーディオワークステーション (DAW)
オーディオインターフェースとDAWを設定した後、以下のガイドラインに従ってGENOMEをハイブリッドリグで使用できるようにセットアップしてください:
-
スタンドアロンアプリケーションを使用する場合は単にアプリケーションを開き、ソースからのオーディオがGENOMEに受信されていることを確認します。
-
DAWを使用する場合:
-
DAWに新しいオーディオチャンネルをロードする
-
チャンネルのインサートでプラグインリストを開きGENOMEを選択する。
-
初めて GENOME をインスタンス化する場合、GENOME へのログインを求められます。
-
正しいアカウント情報が入力されるとGENOMEが開き、レーンベースのアーキテクチャとコンポーネントにアクセスできるようになります。
-
-
-
注:ステレオ入力ソースを持っていてDAW のステレオオーディオチャンネルに GENOME をロードした場合、GENOME はデフォルトで左右のチャンネルをモノ信号ソースに合計します。
GENOMEとモデリングプロセッサの使用法
-
モデリングプロセッサーのラインレベル出力をオーディオインターフェースに接続してください。
-
モデリングプロセッサーに内蔵されているアンプシミュレーションのみを使用したい場合は、本体に搭載されているキャビネットエミュレーションを無効にし、DynIR™ EngineとSTUDIO FX Suiteを含むポストアンプ・シグナルチェーンとしてGENOMEを使用してください。
-
モデリングプロセッサーに内蔵されているペダルFXモデルを使用する場合は、本体に搭載されているアンプとキャビネットのエミュレーションを無効にし、アンプオプション(CODEXまたはTSM™ アンプ・スイート)、DynIR™ エンジン、STUDIO FXスイートを含むポストペダルのシグナルチェーンとしてGENOMEを使用してください。
実物のアンプコレクションでGENOMEを使う
-
アンプを接続する場合は、適切なロードボックス(Torpedo CaptorやCaptor Xなど)に接続してください。ロードボックスはオーディオインターフェイスのラインレベル入力に接続してください。
-
ロードボックスのデジタル/アナログキャビネットエミュレーションを無効にし、DynIR™ EngineとSTUDIO FX Suiteを含むポストアンプシグナルチェーンとしてGENOMEを使用してください。
GENOMEと実際のペダルボードの使い方
-
・注意:ペダルボードがシグナルチェーンの終端に専用のアンプシュミを備えている場合、下記の「GENOMEとハードウェアアンプシュミの使用」をご参照ください。
-
GENOMEを物理的なペダルボードとして一緒に設定するためには、まず、最後のデバイスがラインまたはインストゥルメントレベルの信号を出力しているかどうかを確認してください。
-
インストゥルメントレベルの信号の場合、このペダルを互換性のあるオーディオインターフェイスに接続し、High-Zスイッチをオンにして、インターフェイスをインストゥルメントレベルに最適化します。
-
ラインレベル信号の場合、適切なラインレベル入力を使用してください。
-
-
GENOMEをDAWで実行できたら、次のことができます:
-
GENOME内蔵ペダルと合わせてで実物ペダルボードを拡張
-
GENOME 内蔵ペダルとをCODEX AIアンプ・キャプチャーまたはTSM™アンプに接続
-
ポストGENOMEアンプシグナルにDynIR™またはスタティックIRを適用
-
ポストアンプやキャビネットプロセッシング用にSTUDIO FXを追加
-
GENOMEとハードウェアアンプシュミを使う
-
ハードウェアアンプシュミのラインレベル出力をオーディオインターフェースに接続してください。
-
ハードウェアアンプシュミに内蔵されているアンプシミュレーションのみを使用したい場合、
本機の搭載のキャビネットエミュレーションを無効にし、GENOMEをポストアンプシグナルチェーンとしてDynIR™ EngineSTUDIO FX Suiteを含んで使用出来ます。 -
ハードウェアアンプシュミの内蔵アンプとキャビネットシミュレーションのみを使用したい場合は GENOMEをSTUDIO FX Suiteを含むポストアンプ/キャビネットシグナルチェーンとして使用します。
GENOMEインターフェイス
1. グローバルパラメーター区画
GENOMEのグローバルパラメーターはグラフィカルユーザーインターフェー スの上部にあるグローバルパラメーター区画にあります。これらのパラメータはリグから独立してコンポーネントレベルのプリセットとして保存されます。
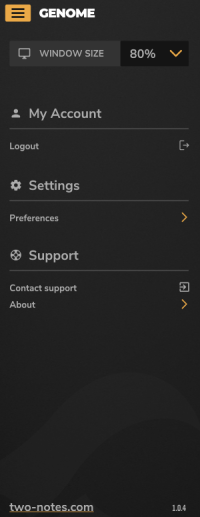
1.1 ハンバーガーメニュー
GENOMEのハンバーガーメニューにはユーザー設定やライセンス情報などのオプシ ョンが用意されています。メニューの3本線アイコンをクリックしてハンバーガーメニューを開き、関連する区画を開いてアクセスし以下の環境設定にアクセスできます:
-
WINDOW SIZE:プラグインのサイズを50%から200%の間で設定します。
-
MY ACCOUNT: ログインとログアウトを含むアカウントに関連する主要な情報にアクセスします。
-
MIDI MAPPING CENTRE: すべてのアーキテクチャーまたはRIGレベルのMIDI割り当てを管理する。
-
(Standalone Application Only) SETTINGS
-
MIDI Devices:MIDI データがスタンドアローンアプリケーションでどのように受信されるかを決定するすべてのオプションを設定します。
-
Audio Settings: ソースオーディオがスタンドアロンアプリケーションでどのように受信されるかを決定するすべてのオプションを設定します。
-
-
SUPPORT: Two notes Helpdeskにチケットを提出し、現在インストールされているGENOMEのバージョンに関連する情報をご覧いただけます。
1.2 入力ルーティング
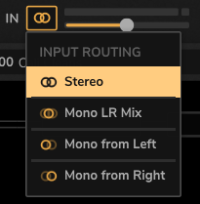
GENOMEの関連入力信号のプラグインへのルーティングを設定するには、GENOMEのグローバルパラメーター区画の左上部分にある ‘ IN’ の横のアイコンをクリックして表示されるドロップダウンメニューを表示します。
GENOME(v1.03)は入力段でステレオまたはモノラル信号を処理するように設定されており、ステレオ信号を互換性のあるモノラルソースに処理する方法を選択する専用のオプションがあります。これらは以下の通りです:
-
Stereo: この場合は入力されたステレオ信号はGENOMEによってステレオ処理されます。
-
Mono LR Mix: この場合はステレオ信号の両チャンネルがモノラル信号に合計されます。
-
Mono from Left: この場合はGENOMEはステレオ信号の左チャンネルのみを処理します。
-
Mono from Right: この場合はGENOME はステレオ信号の右チャンネルのみを処理する。
注:GENOME (v1.02) 以下のユーザーにはStereo オプションはありません。
1.3入力メーターと入力レベルフェーダー
入力メーターと入力レベルフェーダーはGENOMEのグローバルパラメーター区画にあり、ソースオーディオの入力レベルを管理するために素早くアクセスできます。
入力レベルを設定する際、ソースオーディオがクリップしないようにすることが重要であり、その後のコンポーネントのコンフィギュレーションが最適値の限界を超えないようにしてください。
-
入力レベルフェーダーを使って、入力信号のボリュームを-12dBから+12dB調整します。 入力信号レベルが適切な範囲に収まっていることを確認し、付属の入力メーターを使ってGENOMEに入力されるソースオーディオのレベルをモニターします。
-
入力信号の最適な範囲は-18dBから-6dBです。 入力レベルフェーダーを設定した後、ソースオーディオの入力レベルが最適な範囲から外れる場合は、ソースオーディオの信号の音量を下げてください。GENOMEとオーディオインターフェイス到達する前に、ソース信号の音量を下げてください。(ダイレクトモニタリングの場合)またはデジタルオーディオワークステーションのオーディオ編集環境設定、インサートユーティリティプラグイン等を使用して下さい。(再生時)
注:GENOME内では内部シグナルは 32 ビットfloat フォーマットで計算されます。そのためGENOME内では固定 24 ビット処理を使用した場合のように、シグナルを実際に「クリップ」することはできない。 しかし最適なボリュームレンジを維持することで、入力ゲインに敏感なコンポーネント(アンプ/ディストーションペダル)が、指定されたボリュームレンジ内で動作するようになります。
注:GENOMEの入力後、リグ/コンポーネントレベルでは各コンポーネントの出力レベルは次のように調整することができます。
1.4 TUNER
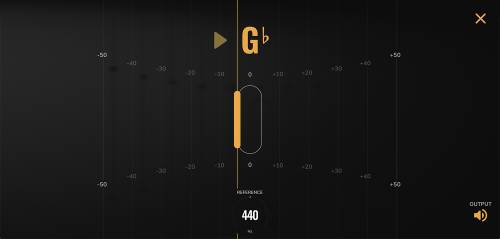
内蔵チューナーは正確なモノフォニックギターとベースのチューニング機能で、GENOMEのグローバルパラメーター区画にあり、音叉のアイコンをクリックしてアクセスします。
-
インスタンス化されるとソース入力の現在のピッチが音符のテキスト表示で示され、付随するグラフィックはソースオーディオがターゲットの半音にどれだけ近いかを示します。
-
リファレンスピッチはREFERENCEコントロールで432Hzから448Hzの範囲で選択できます、デフォルトの標準チューニングリファレンスは440Hzです。
-
チューナー画面 の右下にあるOUTPUT スイッチはサウンドを出力するかどうかミュートするかどうかを決定します。
-
チューナーウィンドウを閉じるにはチューナー画面の右上にある ‘X’ をクリックします。
注:チューナーパラメーターRリグプリセットごとに保存されず、GENOMEのグローバルパラメータコントロールの一部として存在します。
1.5 ノイズゲート
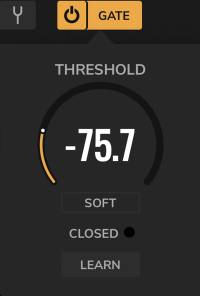
NOISE GATEはGlobal Parameter区画にある補正ユーティリティです。チューナーアイコンの右側にある On/Off ボタンを使用して、インスタンス化および非アクティブ化を行います。
NOISE GATEは指定された入力THRESHOLD 以下のソース信号の音量を下げ、非演奏時のバックグラウンドノイズを低減します。
NOISE GATE設定を表示して編集するには、GATEボタンをクリックします。 NOISE GATE設定を閉じるにはGATE ボタンをクリックするか、GENOME 画面上の他の場所をクリックします。NOISE GATE 設定を表示すると、以下のパラメーターが使用できます:
-
THRESHOLD:NOISE GATEが作動するスレッショルドレベルを設定します。
-
HARD/SOFT:ノイズゲートの動作を設定。 HARDの場合、音が急激にカットされます;SOFTはゲート効果に穏やかなロールオフを適用します。
-
LEARN: このボタンをクリックするとNOISE GATEのLEARNモードが有効になります。
LEARNモードが実行されたら演奏をせず弦をミュートします。GENOMEはソースにプリセットされたバックグラウンドノイズのレベルを計算し、それに応じてTHRESHOLDを設定します。
注:NOISE GATEはグローバルプロセッサーであるためリグごとに保存されません。
1.6 出力メーターと出力レベルフェーダー
GENOMEの出力メーターと出力レベルフェーダーはGENOMEのグローバルパラメーター区画にあります。グラフィカルユーザーインターフェースの右上隅にある OUTモニターの隣にあります。
GENOMEの出力レベルはOutput Level フェーダーで調整できます。出力レベルフェーダーを調整し出力メーターで監視することでプラグインの出力で総合レベルを設定します。出力レベルフェーダーの範囲は-95dB から12dB です。 出力メーターを使用してGENOMEの出力信号レベルをリアルタイムでモニターします。
注:アウトプットレベルフェーダーはグローバルプロセッサーであり、RIGごとに保存されません。
1.7 CPUメーターとオーバーサンプリング
GENOMEのCPUメーターはGENOMEのグローバルパラメーター区画にあります。出力レベルフェーダーの右側にあります。 CPUメーターは現在ロードされているGENOMEインスタンスのCPU使用量を表示します。
オーバーサンプリング
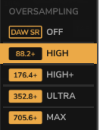
GENOMEのオーバーサンプリングモードはCPUメーターの上にあるドロップダウンメニューから選択しインスタンス化します。 これらのモードではGENOME内でのオーバーサンプリングの量を選択することができます。オーバーサンプリングはオーディオの周波数コンテンツに起因する異常(エイリアシング)を低減します。オーバーサンプリングはGENOMEの動作サンプルレート周波数を超える処理信号の周波数コンテンツに起因するオーディオの異常(エイリアシング)を低減します。 より高いオーバーサンプリングはGENOMEの有効サンプルレートを上げてエイリアシングを防ぎますが、CPU使用率も上がります。 古いコンピュータの場合はCPUへの負荷が少ないOFF設定の使用をお勧めします。 より高速なCPUを搭載した最新のコンピュータでは、オーバーサンプリングの選択は、OFF、HIGH、HIGH+、ULTRA、MAXを含むすべての利用可能なオプションから選択することができます。
UltraおよびMAXオーバーサンプリングモードは、オフラインレンダリング(バウンス)用に設計されています。 これらのモードはCPU 使用率が非常に高くなりますが、音質がわずかに向上します。 再生には適していません。
注:CPUメーターはCPUの総使用量を示すものではなく、現在アクティブなリグおよび関連コンポーネントの処理、バッファ内で使用されているCPU時間を示すメーターです。そのため、ホストまたはシステム中心のCPU使用率メーターとは異なる値が表示されます。
2. リグ設定区画
リグ設定区画はグローバルパラメーター区画のすぐ下にあり、包括的なリグ管理機能を提供します。総合的なリグ管理機能を提供します。GENOMEリグ についての注意事項: GENOMEリグとはレーンベースのアーキテクチャで構成された、あらかじめ指定されたコンポーネントからなるヘッドラインプリセットです。唸るようなリードトーンからアンビエントなサウンドまで、GENOME RIGSの豊富なセレクションを同梱しています。ポストロックのサウンドスケープまで、GENOMEのRIGは至福の音色への早道です。
2.1 リグの選択
リグを選択するにはリグ設定区画の右上にある現在実行されているリグ名をクリックします。これによりGENOMEのリグブラウザが開き、利用可能なすべてのリグを表示、ロード、管理することができます。(2.2. リグブラウザーを参照)。
リグを順番に循環させるにはリグ選択ウィンドウの左側にある上/下矢印を使用します。ウィンドウを選択します、 これにより現在選択されているリグブラウザバンクの前/次のリグをそれぞれロードします。
2.2 リグブラウザー
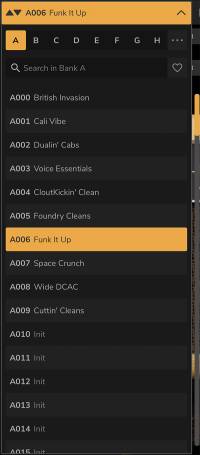
リグブラウザはリグ設定区画内の RIG Select ウィンドウをクリックしてアクセスします。
これはリグ管理ツールでリグバンクを参照、選択、保存、インポート、エクスポートすることができます。 GENOMEのリグブラウザには 8バンクのRIGがあり、バンクごとに最大 128 個の RIG を保存できます。リグブラウザでは以下の情報と編集可能なパラメータを管理することができます。
-
RIG Name: リグブラウザの上部に現在アクティブなRリグの名前が表示されます。現在アクティブなリグの名前が表示されます。 名前の後に星印 (‘*’) が付いている場合は、リグが編集されたことを示します。 星印がついてる場合はそのRIGが編集されたことを示し現在アクティブなリグの保存された別版とは異なります。
-
リグの名前を変更するにはリグブラウザ/リグセレクトウィンドウの上部にある名前をダブルクリックし編集します。
-
またはリグブラウザでリグプリセットにカーソルを合わせ、右側の横3本線ををクリックし’Rename’を選択します。
-
-
Bank Search: 検索ボックスのテキスト入力フィールドを使用して、現在選択されているバンク内のRIGを名前で検索することができます。検索結果は、入力と同時にリアルタイムで更新されます。
-
Bank Select: 現在のRIG Browserバンクを選択するにはRIG Browserの上部にあるBank A〜Hボタンを使用します。
-
Bank Import: バンク全体をインポートするにはリグブラウザのバンクセレクトの右にある3つの点をクリックし、’Import File Over Bank’を選択します。
-
注: この動作は現在のバンクを上書きします。バンクインポートを実行する前にリグを保存してください。
-
-
Bank Export: バンク全体をエクスポートするには、リグブラウザーのバンクセレクトの右にある3つの点をクリックし、’Export Bank To File’を選択します。 オペレーティングシステム固有のファイルブラウザーウィンドウが開きホストマシン上で保存先を選択できます。その場所全体を保存することができます。インスタンス化されたバンク全体を1つの.tnb GENOME リグバンクファイルとして保存します。
-
Favorites: リグブラウザのお気に入り機能ではお気に入りのリグにフラグを付けることができます。 お気に入りリグをお気に入りとしてマークするには、リグブラウザーのリグにカーソルを合わせると表示される、各リグ名の横にあるハートアイコンをクリックします。リグブラウザのリグ表示をお気に入りとしてマークされたリグに絞り込むには、リグブラウザーペインの上部にあるハートアイコンをクリックします
-
Delete RIG: リグを完全に削除するにはリグの対応するリグスロットにカーソルを合わせます。ブラウザーの対応するリグスロットにカーソルを合わせ、リグスロットの右側にある3つの点をクリックし、「Delete」を選択します。
-
Save RIG: リグをリグブラウザーのスロットに保存するには、バンクを選択しリグスロットにカーソルを合わせ、右側の3つの点ボタンをクリックし、’Replace With Current Rig’を選択します。
-
RIG Export: 1つのリグをエクスポートするにはリグブラウザーのリグスロットにカーソルを合わせると表示される3つの点をクリックし、’Export’を選択します。オペレーティングシステムを保存する場所をホストマシンで選択でき、リグを1つの.tnr リグファイルとして保存します。
-
RIG Import: 単一のリグをインポートするには、リグブラウザーのリグスロットにカーソルを合わせると表示される3つの点をクリックし、「Import」を選択します。これにより、オペレーティングシステムをロードするオプションとともに、フォルダとファイルを選択するためのオペレーティングシステム固有のファイルブラウザウィンドウが開きます。.tnrのリグファイルを現在のリグスロットにロードするオプションもあります。
注:これは現在のリグプリセットを上書きします。RIGインポートを実行する前に、既存のRIGが保存されていることを確認してください。
2..3 リグを戻す、リグの保存、元に戻す/やり直し
リグ設定区画の中でGENOMEはインスタンス化されたリグを管理するための包括的なツール一式を提供します。これらのリグ管理ツールはリグ設定区画のRIG Selectツールの右側にあり、以下のオプションがあります:
-
Revert: 編集したリグを保存したリグのバリアントに戻すには、リグ Revertアイコンをクリックします。
-
Save RIG: ディスクアイコンをクリックすると、インスタンス化されたリグが現在のリグスロットに保存されます。
-
Undo / Redo: 編集可能なリグ中心のアクションはUndo/Redo 履歴に保存されます。現在インスタンス化されているリグの変更を元に戻したり、やり直したりするには、以下の機能を使用して編集を前後にナビゲートします
2.4 リグのテンポ
GENOMEのリグのテンポ はリグ設定区画の右上にあり、インスタンス化された リグの一部として保存された現在のBPMを表示します。リグのテンポ BPMディスプレイの左側にある’鍵’アイコンは以下のオプションを提供します:
-
Tempo From Rig:選択した場合、BPMディスプレイをダブルクリックで編集できます。リグのテンポを手動で定義します。
-
Tempo From Rigを選択した場合、TAPボタンを任意の速度でタップすることで、RIGテンポのBPMを手動で設定することもできます。
-
-
(Plugin Application Only) Tempo From Host: 選択した場合、このBPM表示はグレーアウトして編集不可能になります。ホ ストデジタルオーディオワークステーションで設定されたBPMと一致します。
注:GENOME コンポーネントがテンポに同期可能なタイムベースパラメーター(STUDIO Modulation FX や STUDIO Delay など)を備えている場合、どんな同期もGENOMEのRIG Tempoに従って動作します。
3. リグの組み立て
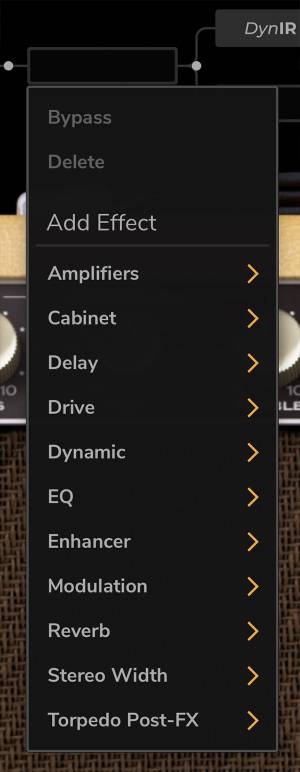
GENOME のリグビルダーには最大 20 個のエフェクトスロット(またはインサート)があり、各エフェクトにGENOMEコンポーネントをロードすることができます。リグブラウザでは複数のコンポーネントを直列または並列に構成してリグを作成することができます。(2.2 リグブラウザ 参照)。
3.1 レーンの設計
GENOME のリグビルダーは並列処理用のデュアルレーンと直列処理用のシングルレーンを構成するオプションを備えたレーンアーキテクチャーを構成するオプションがあります。 GENOMEのレーンアーキテクチャーを通る信号の流れは左から右に流れます。
一番左のインサートは GENOME のソースから入力を受ける、一番左のInsertはGENOMEのソースから入力を受け、Input Level Faderを経て、一番右のInsertはインスタンス化されたリグ全ての処理へて出力され、デジタルオーディオワークステーショ ンに信号を戻します。
3.2 自動モノラルとステレオ信号の流れを管理
GENOMEのソースは常にモノラルで構成されるますが、GENOMEのコンポーネントアーセナル内のコンポーネントはモノラルまたはステレオプロセッサーとして分類されます。そのため指定されたコンポーネントはモノラルまたはステレオの分類に基づき、入力段階のそれに応じて前段のオーディオで処理されます。
ほとんどの場合、コンポーネントの入力をモノラルで処理するか、ステレオで処理するかをユーザーが定義することはできません。しかし特殊なケースではステレオコンポーネントにモノ入力を強制することができます(STUDIO ReverbとSTUDIO Delayがその例です)。使いやすくするために、GENOMEは自動的に以下のルーティングを管理します。インサートを接続するラインは、その接続がどのタイプであるかを示します。
-
インスタンス化されたコンポーネントがモノ入力を持つ場合、1本のラインが直前のコンポーネント/インサート
-
インスタンス化されたコンポーネントがステレオ入力を持つ場合、2本のラインが直前のコンポーネント/インサート
一度ステレオで処理された信号はモノ入力用に設定されたコンポネントを通過するまでステレオのままです。同様に、信号がモノの場合ステレオ入力用に設定されたコンポーネントを通過するまでモノのままです。
3.3 コンポーネントの管理
新しいコンポーネントの追加からGENOME のレーンベースのアーキテクチャ内でのコンポーネントの移動まで、コンポーネント管理は超直感的なプロセスとして構成されています。 リグを構成する際に利用可能な主なコンポーネント管理ツールは以下に詳細の通りです。
3.4 ノード
GENOMEのレーンアーキテクチャーにカーソルを合わせると、すべてのインサートの間に位置するノードが表示されます。 ノードはGENOMEのレーン分割/マージ機能を設定するために使用されます。
GENOMEのレーンスプリット /マージ 機能はリグ内で並列処理を可能にします。例えばアンプやキャビネットをルーティングするように設定できます。コンポーネントをパラレルにルーティングし、マージされたSTUDIO FXチェーンに直列に供給するように設定できます。
3.5 レーンを分岐
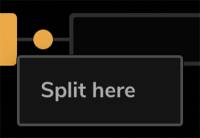
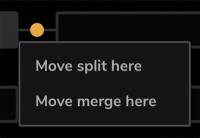
直列ルーティングで設定されたレーンを分割するには、2つのターゲットインサート間のノードをクリックし、’Split Here’を選択します。スプリットジャンクションを移動するには、別のターゲットノードをクリックし、’Move Split Here’ を選択します。
3.6 レーンの合併ミキサー
分割されたコンフィギュレーションを単一のレーンにマージして直列処理を行うには、以下の間にあるノードをクリックし、’Move Merge Here’を選択します。
注:マージジャンクションがインスタンス化されていない場合、処理されたシグナルは常に最後のInsertの後、リグ出力の前にマージされます。
3.7 レーンの合併ミキサー
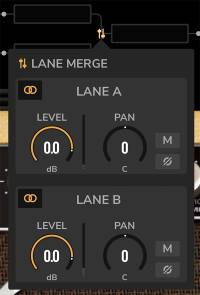
マージジャンクションではレーンマージミキサーを使用して2つの平行レーンを混合することができます。 これはレーン合流ジャンクションに表示されているミキサーアイコンをクリックします。 レーンマージミキサーのレーンA(上のレーン)とレーンB(下のレーン)のパラメータは同じです:
-
Lane Mono/Stereo Routing: それぞれのレーンの信号のステレオ/モノ構成を定義します: 上 からステレオ、モノラルLRミックス、レフトからモノラルへ、ライトからモノラルへ
-
LEVEL: 各レーンの音量レベルを-95dB~12dBの範囲で設定。
-
PAN: 各レーンのパン値を左全開から右全開内で設定します。
-
MUTE: :レーンのミュート/アンミュートをコントロールします。
-
PHASE INVERT: レーンの位相を反転させるコントロール。
GENOMEコンポーネント
1. プリセット管理とすべてのGENOMEコンポーネントに共通なプリセット管理
GENOMEの各コンポーネントにはエフェクトのバイパス/エンゲージスイッチ、保存されたプリセットのドロップダウンメニュー、プリセットを循環させる矢印、インポート/エクスポートオプションを備えたコンポーネントモジュールプリセットブラウザがあります。
-
プリセットを保存するにはディスクアイコンをクリックし、プリセットの名前を入力します。
-
ドロップダウンメニューの各プリセットにカーソルを合わせると、3つの横並びドットが表示され、 様々なプリセット管理ツールに素早くアクセスできます。
管理オプションには選択したプリセットをリスト内で上下に移動したり、置換、複製、名前の変更、または削除する機能があります。 プリセットはこのメニューからエクスポートすることも出来ます。 -
現在のプリセットをホストマシンのファイルにエクスポートするには、プリセットブラウザの右にある横並びの3つの点をクリックします。
コンポーネント出力レベル
GENOME RIGの各コンポーネントは、OUTPUT LEVELの専用コントロールを備えています。 これはエフェクトモジュールのグラフィカルユーザーインターフェイスの右下に表示されます。コンポーネント出力レベルは、ボリューム補正とコンポーネント間ゲインステージに使用できます。
処理された信号のレベルを、隣接したコンポーネントに渡す前に希望するレベルを設定します。
精密パラメーターコントロール
GENOMEコンポーネント内のパラメータを編集する場合、値の微調整が可能です。
CTRL(PC)/CMD(MAC)を押しながらドラッグすることで値の微調整が可能です。
パラメーターのリセット
コンポーネントのパラメータをデフォルト値に戻すにはパラメータ名をダブルクリックします。
2. TSM™ Amplifiers
2.1 Foundry
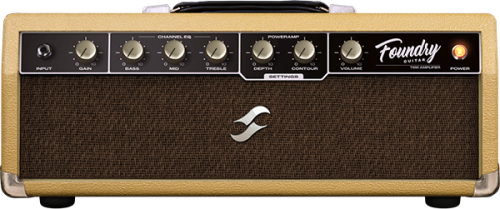
Whether it’s a pristine high-headroom clean or a primo foundation for your pedal collection, Foundry delivers. In short, it’s the epitome of a classic Cali clean, brimming with warm saturation and engineered to capture every subtle nuance of your delivery.
2.2 Foundry Bass
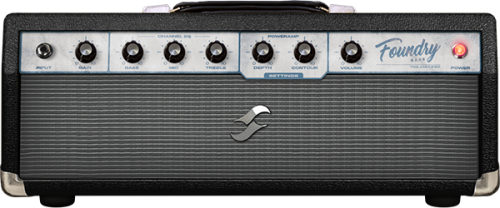
Whether it’s a pristine clean or a primo foundation for your pedal collection, Foundry Bass delivers. In short, it’s the epitome of a classic Bass clean, brimming with warm saturation and engineered to capture every subtle nuance of your delivery.
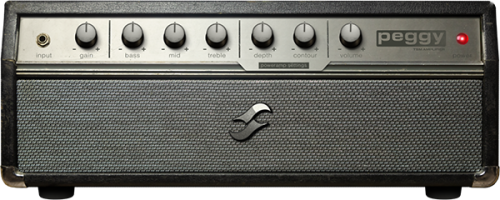
2.3 Peggy
Bass players seeking the pinnacle in low-end theory, look no further than Peggy. Pushing complex harmonic overtones, a warm midrange and oodles of rafter ratlin’ thump, Peggy delivers the perfect blend of classic ’60s bass sonics with expertly-tuned tweak-ability to sit your tone in any pocket!
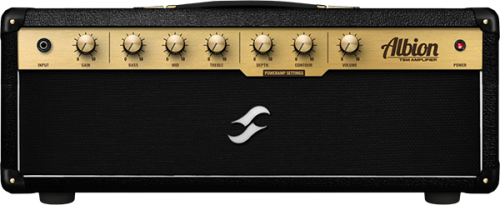
2.4 Albion
For those times when only a legendary Brit-inspired roar will suffice, there’s Albion. Complete with a rich, vocal mid-range, lashings of punch, boat-loads of power and gain-for-days, Albion is your secret weapon when diving head-first into Classic- and Hard-Rock territory.
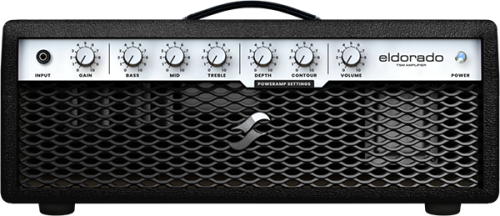
2.5 ElDorado
Tight response? Check. Rich in harmonics? Check. Searing, perfectly balanced gain fused with lashings of sustain? Oh Yes! This really is a “triple threat” for the guitarist venturing into hard-rock and metal territory.
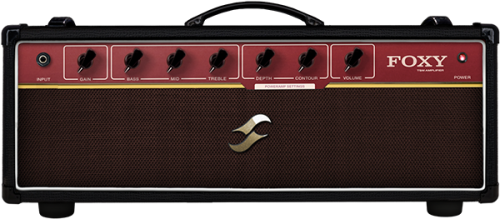
2.6 Foxy
Seeking chime, articulation and buttery-smooth presence? Foxy’s a one-stop-shop! With airy highs, impeccable breakup and sublime mid-range bite when pushing the gain, Foxy is primed to take on everything from sultry Jazz to rauch-fuelled Rock n’ Roll.
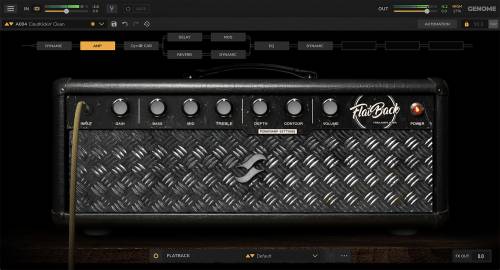
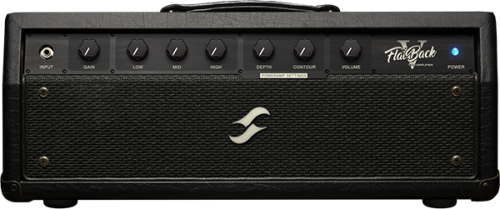
2.7 FlatBack
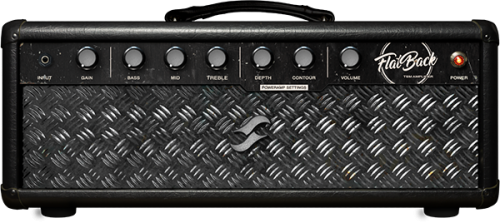
Looking for some Cali-born high-gain sonics, pushing the perfect combination of unrelenting power and deft levels of clarity? FlatBack’s a one-stop-shop offering lashings of harmonically rich overtones, a full bodied low-end and articulation for days!
2.8 Aviator
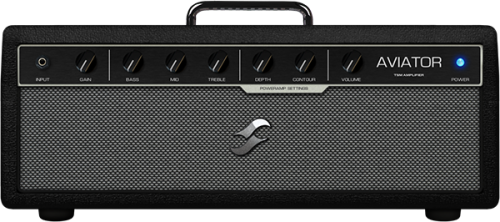
Looking for the epitome of a modern, forward-thinking bass tone? You owe it to your tone to check out Aviator. Whether it’s rafter-rattlin lows, or a high-gain onslaught fused with the all-important clarity your tone demands, this TSM™ Amplifier delivers on all counts!
2.9 NiftyFifty
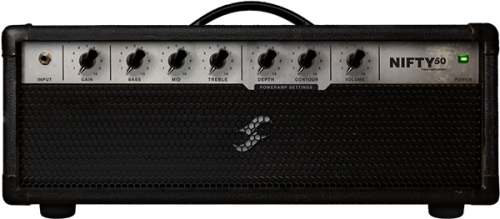
Want gain? Nifty50’s got it on tap! It’s aggression incarnate. It’s punchy. It’s super-versatile covering everything from a warm full-throttle onslaught to a searing lead tone that cuts through any mix. Whether it’s the darker side of metal or a tone that wouldn’t be amiss in 80’s inspired virtuosity, Nifty50 is deserving of any contemporary player’s sonic arsenal.
2.10 Gemini
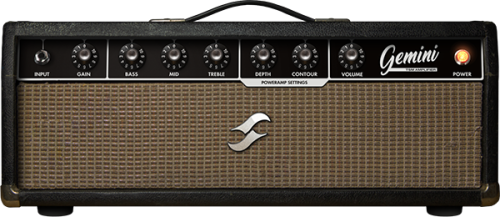
For players seeking an alt slant on the iconic Bear-State clean, Gemini is just what the doctor ordered! At its core it delivers an articulate touch-sensitive sparkling-clean with oodles of warm breakup when pushed – in a nutshell, it’s contender #1 when it comes to getting the best from your overdrive pedal collection, lest we forget a dead-cert to pair with a vintage spring reverb for the epitome of a retro-inspired tone!
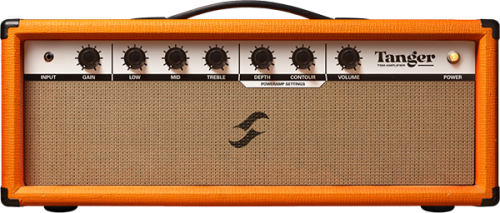
2.11 Tanger
When you’re in the market for sheer versatility – covering everything from a well-rounded articulate clean to a full-throttle high-gain onslaught – Tanger delivers on all counts! Fusing boat-loads of punch, lashings of sustain and a unique brit-inspired gain stage, Tanger ‘aint no one-trick-pony – it’s a powerhouse of tone primed for virtually any performance or recording scenario!
2.12 FlatBackFive
Looking for an alternate slant on Gold Coast high-gain sonics, complete with unrelenting gain, the perfect blend of relentless power and deft levels of precision? If the answer’s a resounding “YES”, then FlatBackFive is an absolute must-have!
2.13 Parameters Common to All TSM™ Amplifiers
The following parameters are available on all TSM™ Amplifier models:
INPUT (Preamp) Stage:
-
GAIN: Sets the amount of input gain applied to the preamp stage. Higher settings will drive the input more, increasing the amount of PREAMP distortion. An additional method of adding more gain at the input is to increase the output volume of the previous component block.
-
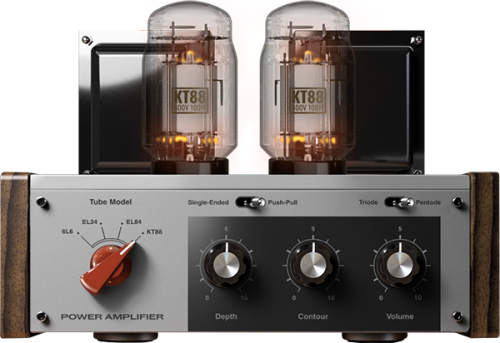
CHANNEL EQ: Each TSM™ Amplifier features a custom voiced 3-band Tone Stack, specific to the instantiated amplifier model
-
BASS: Adjusts the level of bass frequency content for the selected model
-
MID: Adjusts the level of mid frequency content for the selected model
-
TREBLE: Adjusts the level of high frequency content for the selected model
-
POWERAMP Stage:
-
DEPTH: Increasing this control adds more low frequency content to the POWERAMP stage
-
CONTOUR: Low values result in reduced bass and treble frequency content creating a more ‘mid-focussed’ tone; higher settings will increase the bass and treble frequency content while reducing mid-range frequencies resulting in a more ‘scooped’ sound
-
VOLUME: Sets the tube output stage volume. As well as increasing the output volume, higher settings will also drive the output more, increasing the amount of POWERAMP distortion
-
SETTINGS: Clicking the SETTINGS button will reveal the customisable POWERAMP SETTINGS pane complete with dedicated options for Tube Model, Type and Configuration. The following controls are available for surgical tuning of the selected POWERAMP’s tone:
-
Tube Model: Choose between 6L6, EL34, EL84 & KT88 Tube Models
-
Tube Configuration: Select whether the selected Tube Model is configured in SINGLE-ENDED or PUSH-PULL states
-
Tube Type: Define whether the Tube model is a TRIODE- or PENTODE-centric emulation
-
3. TSM-Ai™ Amplifiers
3.1 PVH50
Introducing the PVH50, a titan-grade twin-channel TSM-Ai Amplifier inspired by the nefarious Peavey® 5150 (BLOCK). Engineered with the preferences of a legit guitar icon in mind, the Peavey® 5150 is regarded by many as the ultimate tonal powerhouse, revered for its supreme versatility in catering for everything from a raunchy rock crunch to a full-blown articulate metalcore onslaught.
The following parameters are available on within the PVH50:
-
CHANNEL (Switch): Switches the active Channel between PVH50’s LEAD and RHYTHM Channels
-
INPUT (Switch): Switches the active input (HIGH GAIN or NORMAL GAIN) for PVH50’s instantiated CHANNEL offering modified tonal responses
RHYTHM Channel Controls
-
PRE GAIN: Adjusts the input gain for PVH50’s RHYTHM Channel affecting the volume and subsequent drive produced by the related channel
-
BRIGHT (Switch): Applies a boost to the RHYTHM Channel’s mid-range and treble frequency content irrespective of the CRUNCH (Switch) state
-
CRUNCH (Switch): Switches the RHYTHM Channel between Clean and Crunch modes
-
RHYTHM EQ
-
LOW: Use this control to attenuate or boost the Bass frequency content of the related channel’s processed signal
-
MID: Use this control to attenuate or boost the Mid-Range frequency content of the related channel’s processed signal
-
HIGH: Use this control to attenuate or boost the High frequency content of the related channel’s processed signal
-
VOLUME: Sets the volume of PVH50’s RHYTHM Channel relative to the volume of PVH50’s LEAD Channel
-
LEAD Channel Controls
-
PRE GAIN: Adjusts the input gain for PVH50’s LEAD Channel affecting the volume and subsequent drive produced by the related channel
-
RHYTHM EQ
-
LOW: Use this control to attenuate or boost the Bass frequency content of the related channel’s processed signal
-
MID: Use this control to attenuate or boost the Mid-Range frequency content of the related channel’s processed signal
-
HIGH: Use this control to attenuate or boost the High frequency content of the related channel’s processed signal
-
-
VOLUME: Sets the volume of PVH50’s LEAD Channel relative to the volume of PVH50’s RHYTHM Channel
POWERAMP Controls
-
RESONANCE: Applies a global scaled resonance boost / reduction to the low / low-mid frequency content of PVH50’s sound output
-
PRESENCE: Applies a global scaled presence boost to the sound output of PVH50
-
MASTER: Sets the global volume of PVH50’s Poweramp; increased values drive the Poweramp resulting in increased distortion, harmonics & compression
Additional Controls
-
POWER (Switch): Sets whether the TSM-Ai component is bypassed or engaged
-
POWERAMP (Switch): Enables or disables the poweramp emulation for both channels of the PVH50 TSM-Ai amplifier. When disabled we recommend using the stock POWERAMP GENOME Component to configure a custom Poweramp emulation immediately post the PVH50 Component
-
QUALITY MODES: The following quality modes are accessible via the ellipses menu in the the PVH50 TSM-Ai amplifier interface
-
STANDARD: Engage this setting for performance / playing scenarios where low CPU load is required
-
HIGH: Engage this setting for improved definition and reduced aliasing, perfect for render-centric scenarios
-
3.2 Calibro73
 Introducing CaliBro73, a certified GENOME-essential twin-channel TSM-Ai Amplifier inspired by the legendary 1973 Fender® Bassman. Although ‘technically’ a Bass Amplifier, today the Fender® Bassman has cemented itself as the ultimate pedal-platform Guitar Amplifier. Pairing perfectly with virtually any driver configuration, it’s a go-to for players of all walks seeking the warmth, articulation and quintessential essence of a Californian-born clean.
The following parameters are available on within the CaliBro73:
-
CHANNEL SELECTION (Switch): Use this control to switch between the BASS INSTRUMENT Channel, NORMAL Channel or a BRIDGE Setting featuring a 50/.50 split of the BASS INSTRUMENT and NORMAL Channels
BASS INSTRUMENT Channel Controls
-
DEEP (Switch): Use this switch to increase the mid & treble frequency content when in the up position, and cut the mid & treble frequency content when set to the down position
-
VOLUME: Sets the volume of CaliBro73’s BASS INSTRUMENT Channel relative to the volume of CaliBro73’s NORMAL Channel
-
TREBLE: Use this control to attenuate or boost the High frequency content of the related channel’s processed signal
-
MIDDLE: Use this control to attenuate or boost the Mid-Range frequency content of the related channel’s processed signal
-
BASS: Use this control to attenuate or boost the Bass frequency content of the related channel’s processed signal
NORMAL Channel Controls
-
BRIGHT (Switch): Applies a simulated Bright Cap parallel with the volume pot creating a path where high-end frequency content bypasses CaliBro73’s NORMAL Channel VOLUME control. As the VOLUME control is turned up, the non-affected mid-range and low- end frequency content relative to the treble frequency content ballance and the effect of the Bright Cap is negated
-
VOLUME: Sets the volume of CaliBro73’s NORMAL Channel relative to the volume of CaliBro73’s BASS INSTRUMENT Channel
-
TREBLE: Use this control to attenuate or boost the High frequency content of the related channel’s processed signal
-
MIDDLE: Use this control to attenuate or boost the Mid-Range frequency content of the related channel’s processed signal
-
BASS: Use this control to attenuate or boost the Bass frequency content of the related channel’s processed signal
POWERAMP Controls
-
MASTER: Sets the global volume of CaliBro73’s Poweramp; increased values drive the Poweramp resulting in increased distortion, harmonics & compression
Additional Controls
-
POWER (Switch): Sets whether the TSM-Ai component is bypassed or engaged
-
POWERAMP (Switch): Enables or disables the poweramp emulation for both channels of the PVH50 TSM-Ai amplifier. When disabled we recommend using the stock POWERAMP GENOME Component to configure a custom Poweramp emulation immediately post the PVH50 Component
-
QUALITY MODES: The following quality modes are accessible via the ellipses menu in the the PVH50 TSM-Ai amplifier interface
-
STANDARD: Engage this setting for performance / playing scenarios where low CPU load is required
-
HIGH: Engage this setting for improved definition and reduced aliasing, perfect for render-centric scenarios
-
4. STUDIO FX
4.1 DynIR Engine
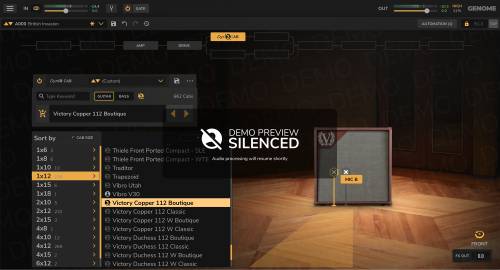
Conquering the dividing line between sublime authenticity and uncompromising digital emulation, DynIR™ represents the pinnacle in virtual guitar- and bass-cabinet technology. Harnessing power equivalent to 160,000 studio- grade IR files, each Two notes DynIR™ can be shaped to the needs of even the most discerning tone chaser. With 8 mics per cabinet, dual mic-ing and 10K mic positions (front & back), unleashing your tone and finding your signature sound has never been simpler.
Top Tip: For optimal performance, the DynIR™ Engine should be placed post a TSM™ Amplifier or the CODEX Engine to recreate a typical guitar-centric signal chain.
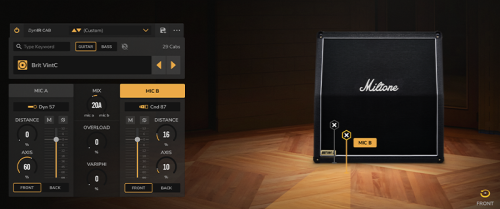
The DynIR™ Engine’s GUI is divided up into four sections:
-
Top Left: Cabinet Explorer/Selection
-
Bottom Left: Microphone Controls (MIC A and MIC B)
-
Central Pane (in-between the MIC A & MIC B channels): Global Controls
-
Right: Cabinet & Microphone Interactive Mic’ing Quadrant
Cabinet Explorer/Selection: The Cabinet Explorer/Selection section is used to browse and select which DynIR™ Cabinet is loaded within the DynIR™ Engine. Within this section, the following controls are available:
-
Text Search Box: The Text Search Box grants comprehensive searching facilities across Two notes’ extensive catalog of DynIR™ virtual cabinets, with the resulting Cabinet Explorer list being adjustable depending on the filtering criteria determined by the user. To remove the text search filter, click the red ‘X’ on the left of the box. The following filters are available to the user to refine the DynIR™ virtual cabinets shown within the Cabinet Explorer list:
-
GUITAR/BASS Filter Switches: Selecting GUITAR or BASS limits the Cabinet Explorer list to DynIR™ virtual cabinets captured from either Guitar or Bass cabinets respectively
-
Ownership Filter: Clicking the icon positioned to the right of the GUITAR/BASS Filter Switches toggles the ‘Owned’ filter – if instantiated/highlighted, the Cabinet Explorer will list any DynIR™ virtual cabinets not currently owned and therefore assigned to the user’s Two notes account ID; all non-owned cabinets shown within the Cabinet Explorer are available to demo and subsequently purchase. When in demo mode, only one microphone channel is available within the DynIR™ Engine’s GUI; in addition, GENOME will insert silence at random intervals until either an owned cabinet is instantiated and the demonstration mode exited, or the related cabinet is purchased from the Two notes store
-
DynIR Cabinet Quantity Display: This is positioned To the right of the GUITAR/BASS Filter Switches and the Ownership Filter; here, a number is displayed indicating the quantity of DynIR™ virtual cabinets currently listed in the Cabinet Explorer
-
-
Selected Cabinet Name Display Box: The currently instantiated DynIR™ virtual cabinet name is displayed in the Cabinet Name Display Box.
-
Clicking in this box will reveal the Explorer/Browser window where cabinets can be selected based on SPEAKER SIZE, CAPTURE MASTER (the studio / party that created the capture), and OWNERSHIP (whether the license for the cabinet has been assigned to your Two notes account license)
-
Note: This list will already be filtered by the GUITAR/BASS Filter, the Ownership Filter button, and any currently active Text Search
-
-
Using the Explorer window, cabinets can be selected by highlighting a cabinet type in the left pane, and selecting a specific cabinet in the right pane
-
The resultant cabinet list can be further refined by using the dedicated Sort Options positioned at the top of this Explorer/Browser window, either alphabetically (A-Z), by CAPTURE MASTER or by OWNERSHIP status
-
The left/right arrows to the right of the Selected Cabinet Name Display Box cycle through all cabinets in the currently filtered list.
-
Microphone Controls (MIC A and MIC B): Each of the two microphones available to mic up the instantiated DynIR™ virtual cabinet share the same set of controls, located within the two Microphone Channels of the GENOME DynIR™ Engine component GUI; note that these controls are specific to each Microphone channel, both of which have been configured to operate independently from one another. The microphone controls common to the MIC A and MIC B channels are as follows:
-
Microphone Type Drop-Down: Use this option to choose a Microphone for the selected Microphone channel from a list of eight microphones used to capture the instantiated DynIR™ virtual cabinet. Selecting ‘Bypass’ from this menu will remove any microphone-processing from this channel
-
Microphone Channel Controls:
-
DISTANCE: Adjusts the microphone distance from the speaker cabinet
-
AXIS: Adjusts the microphone position; from on-axis (in the middle of the speaker cone), to off-axis (towards the edge of the speaker cone)
-
Mute: The ‘M’ button mutes/unmutes the associated Microphone Channel
-
Phase Invert: The “Ø” button inverts the phase of the associated microphone channel
-
Microphone Volume Fader: Adjusts the selected Microphone Channel’s volume, from -inf to +12dB
-
FRONT/BACK Selection: FRONT will place the mic in front of the cabinet, BACK will place the microphone at the rear of the cabinet
-
Global Controls:
-
MIX: Adjusts the balance between the MIC A and MIC B Microphone Channels
-
OVERLOAD: Simulates speaker cone break-up
-
VARIPHI: The VARIPHI parameter is a one-of-a-kind control, exclusive to Two notes Torpedo and software ecosystem technology. It allows you to modify the frequency content of the signal, using the properties of the sum of two signals with different phase levels. Essentially, you emulate a situation where two microphones are used, and the VARIPHI parameter controls the distance (hence the phase relation) between the two microphones
Cabinet & Microphone Interactive Mic’ing Quadrant: The Cabinet & Microphone Interactive Mic’ing Quadrant permits placement of the instantiated microphones by dragging them within a pre-designated area relative to the selected cabinet’s speaker. When manually moving microphones in this manner, related parameters in the Microphone Controls (MIC A and MIC B) section will update accordingly.
-
The selected microphones can be placed on- or off-axis, relative to the speaker
-
The selected microphones can be moved away from the speaker to pick up more of the ‘room’ sound
-
A ‘Speaker Aim Assist’ (‘+’ sign) is displayed on the cabinet grill to aid with microphone axis positioning when the selected microphones are being placed within the mic’ing quadrant
-
Holding CMD (Mac) / CTRL (PC) while dragging allows for refined positioning with a greater degree of clinical accuracy
-
If the microphone you wish to select is ‘hidden’ by the companion microphone, use the MIC A or MIC B buttons in the Microphone Controls (MIC A and MIC B) section to instantiate it
-
At the bottom right of the DynIR™ Engine’s GUI, a FRONT/BACK selector allows the cabinet to be viewed from the front or back facilitating microphone placement in front or behind the cabinet respectively
4.2 IR Loader
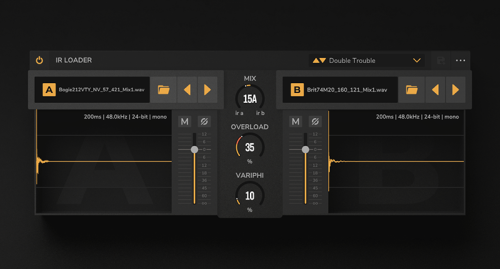
Purpose engineered to load static cabinet IR files – and featuring capacity for 2 static IRs per component instance – the IR loader is primed to load and adapt all your Mono or Stereo .wav, .aiff and .tur files to perfection. Some key features of the IR Loader include:
-
Up to two IRs can be loaded in each IR Loader component, edited, and the resulting Output IR used in your RIG
-
Loaded IRs can be up to 2 seconds in length. If the IR File is over 2 seconds, the file will be automatically truncated to 2 seconds
-
Supported File Formats are .wav, .aiff and .tur in mono; the files can also exhibit different sample rates or bit depths to the current project settings
IR Browser and Selection:
-
To select the folder on your host computer’s file system where your IRs are stored, use the Folder icon and navigate to the desired location
-
Once a folder has been selected, the left/right buttons will cycle through the IRs in that folder
-
The name of the currently loaded IR file is displayed in the IR File Name Text Box
-
Clicking the IR File Name Text Box will bring up a drop-down menu where individual IRs can also be selected and loaded
-
When an IR is loaded, the Waveform/Info Window displays the IR alongside the specifications of the instantiated IR file
IR Editing Controls: For each IR Channel (IR A and IR B), the following controls are available:
-
MUTE: The ‘M’ button mutes/unmutes the related IR Channel
-
PHASE INVERSION: The Ø button inverts the phase of the IR Channel when engaged
-
VOLUME: Adjusts IR Channel volume, from -95dB to +12dB
Global Controls: The following global controls are available, affecting but the IR A and IR B channels:
-
MIX: Adjusts the balance between the IR A and IR B channels
-
OVERLOAD: Simulates speaker cone break-up.
-
VARIPHI: The VARIPHI parameter is a one-of-a-kind control, exclusive to Two notes Torpedo and software ecosystem technology. It allows you to modify the frequency content of the signal, using the properties of the sum of two signals with different phase levels. Essentially, you emulate a situation where two microphones are used, and the VARIPHI parameter controls the distance (hence the phase relation) between the two microphones
FX Options Submenu: Further controls are available from the FX Options Submenu Icon in the top right of the GUI:
-
ALIGN MODE: The following controls are available:
-
NONE: The IR file is processed without changes
-
MIN PHASE: The IR files are automatically configured to be in phase with one another
-
MIN LATENCY: The IR files are placed to generate the minimum possible latency
-
-
TIME UNIT: The following controls are available:
-
MILLISECONDS: Selects whether the IR length should be displayed in milliseconds in the Waveform/Info Window
-
SAMPLES: Selects if the IR length should be displayed as a number of samples in the Waveform/Info Window
-
4.3 STUDIO Delay
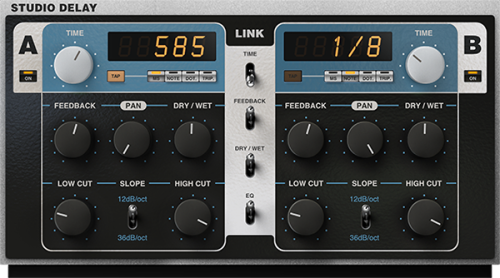
The STUDIO Delay is a pro-grade STUDIO FX component developed by Two notes Audio Engineering for use exclusively within GENOME. Fusing dual-channel (stereo/dual-mono) operation, tempo-synced & free-form delay times, comprehensive channel link facilities, dedicated channel filters and every mainstay you would expect from a studio-grade delay, creating anything from an ambient post-rock delay bed to a mix-cuttin’ slapback is ripe and ready for the taking.
The A Channel and B Channel both share the same arsenal of controls; these can be linked together using the LINK switches located in the central pane of the STUDIO Delay’s GUI under the TIME, FEEDBACK, DRY / WET & EQ labels.
The A- and B-Channel’s delay times can be manually adjusted in milliseconds, or can be synced to the current RIG tempo. In addition, HIGH CUT and LOW CUT filters can be engaged to alter the tone of the repeats as they decay.
Note: The input to the STUDIO Delay Component can be either mono or stereo; to configure this, click the three dots in the Preset Browser at the bottom of the GUI, and select the Wet Summing option. For more details on the STUDIO Delay’s Preset Browser, please refer to “Component Presets and Preset Management Common to All GENOME Components”
Controls common to both the A- and B-Channels:
-
ON: Sets whether the related channel is bypassed or engaged
-
TIME: Sets the delay time, either in ms, or subdivisions of the beat, depending on the mode selected:
-
ms Mode: Manually sets the delay time from 1ms – 8000ms
-
Note Mode: Sets the delay time to subdivisions of the beat from 1/64 to 8/1
-
Dot Mode: Sets the delay time to dotted subdivisions of the beat from 1/64d to 8/1d
-
Trip Mode: Sets the delay time to triplet subdivisions of the beat from 1/64t to 8/1t
-
-
TAP: When in ms Mode, this can be used to set the delay time manually by tapping at the desired speed
-
FEEDBACK: Controls the number of delay repeats, or the ‘regeneration’ amount
-
PAN: Sets the pan position of the channel’s delayed signal
-
DRY / WET: Controls the volume of the delayed signal relative to the input signal
-
LOW CUT: Sets the frequency of the LOW CUT filter that is in the delay loop from 10Hz to 5kHz
-
HIGH CUT: Sets the frequency of the HIGH CUT filter that is in the delay loop from 100Hz to 20kHz
-
SLOPE: Alters the steepness of both the HIGH CUT and LOW CUT filters, allowing for different tonal options
4.4 STUDIO Reverb
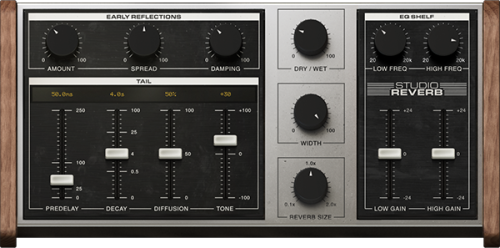
The STUDIO Reverb is a pro-grade STUDIO FX component developed by Two notes Audio Engineering for use exclusively within GENOME. Combining every mainstay control you demand from a studio verb, with an easy-to-use interface for expert-level tone-shaping, the STUDIO Reverb is primed for everything from an expansive cloud-like wash to a hyper-accurate room simulation.
GENOME’s STUDIO Reverb provides extensive control over both the TAIL and EARLY REFLECTIONS via the dedicated editing panes in the STUDIO Reverb’s GUI (for more information, please see below). For rapid setting of the overall Reverb length – via simultaneous adjustment of the EARLY REFLECTIONS, PREDELAY and TAIL – a handy SIZE parameter is available to expand and contract all noted Reverb lengths at the same time.
Note: The input to the STUDIO Reverb Component can be either mono or stereo; to configure this, click the three dots in the Preset Browser at the bottom of the GUI, and select the Wet Summing option. For more details on the STUDIO Reverb’s Preset Browser, please refer to “Component Presets and Preset Management Common to All GENOME Components”
The interface is split into four main areas:
-
Top Left Pane: Early Reflections
-
Bottom Left Pane: Reverb Tail
-
Right Pane: Post-Reverb EQ
-
Middle Pane: Global Controls
Early Reflections:
-
AMOUNT (0 – 100): Sets the volume of the early reflections
-
SPREAD (0 – 100): Sets the time spacing between reflections, or the ‘room size’
-
DAMPING (0 – 100): Sets the Early Reflection high frequency damping, affecting the ‘color’ of the room from bright to dull
Reverb Tail:
-
PREDELAY (0 – 250ms): Sets the time delay before the reverb tail starts
-
DECAY (0.1 – 100secs): Sets the decay time of the Reverb Tail
-
DIFFUSION (0 – 100): Sets the ‘smearing’ of the reverb tail, where higher settings make the reverb more diffuse
-
TONE (-100 – +100): Controls the high frequency damping, allowing spaces that feel brighter or darker
Post-Reverb EQ:
-
LOW FREQ (20hz – 20kHz): Sets the frequency of the Low Shelf Filter
-
HIGH FREQ (20hz – 20kHz): Sets the frequency of the High Shelf Filter
-
LOW GAIN (-24 – 24dB): Sets the level of gain applied to the Low Shelf Filter
-
HIGH GAIN (-24 – 24dB): Sets the level of gain applied to the High Shelf Filter
Global:
-
DRY / WET (0 – 100): Sets the balance between DRY and WET signals
-
WIDTH (0 – 100): Sets the stereo WIDTH of the overall Reverb, from Mono to full Stereo
-
REVERB SIZE (0.1 – 2.0): Simultaneously expands or contracts the three time-based controls (SPREAD, PREDELAY, DECAY) to adjust the overall length of the Reverb
4.5 STUDIO Chorus
In the market for a rich, liquid tone fused with fuss free operation? The STUDIO Chorus is a one-stop-shop! Whether it’s a smooth, subtle modulation or a dramatic contemporary ensemble with lashings of width, this GENOME component delivers everything you need in a format that keeps you focussed on your all-important performance!
Within the STUDIO Chorus, the following parameters are available to configure the Chorus effect:
-
SPEED: Determines the speed of the modulation in either Hertz or beat subdivisions depending on the mode selected:
-
Hz Mode: Allows manual control of the modulation speed from 0.03Hz to 5Hz
-
Note Mode: Sets the modulation speed to subdivisions of the beat from 1/64 to 8/1
-
Dot Mode: Sets the modulation speed to dotted subdivisions of the beat from 1/64d to 8/1d
-
Trip Mode: Sets the modulation speed to triplet subdivisions of the beat from 1/64t to 8/1t
-
-
FEEDBACK: Sets the ‘Regeneration’ amount that adds resonance to the modulation effect
-
DRY / WET: Controls the volume of the Chorus effect relative to the input signal
-
AMOUNT: Sets the range of the modulation, with higher settings sweeping the modulation over a greater range
-
WIDTH: Adjusts the stereo width of the Chorus effect
4.6 STUDIO Vibrato
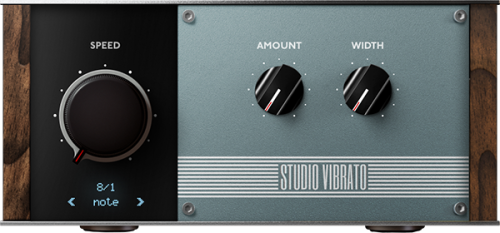
Want to add a touch of vibrato to your tone fast? The STUDIO Vibrato delivers on all counts! With an elegant 3-parameter operation, expertly-tuned to deliver contemporary and traditional modulations alike, the STUDIO Vibrato is a guaranteed final destination and a must-have in the modern guitarist’s sonic arsenal.
Within the STUDIO Vibrato, the following parameters are available to configure the Vibrato effect:
-
SPEED: Determines the speed of the modulation in either Hertz or beat subdivisions depending on the mode selected:
-
Hz Mode: Allows manual control of the modulation speed from 0.1Hz to 10Hz
-
Note Mode: Sets the modulation speed to subdivisions of the beat from 1/64 to 8/1
-
Dot Mode: Sets the modulation speed to dotted subdivisions of the beat from 1/64d to 8/1d
-
Trip Mode: Sets the modulation speed to triplet subdivisions of the beat from 1/64t to 8/1t
-
-
AMOUNT: Sets the range of the modulation, with higher settings modulating the pitch over a greater range. The maximum pitch variation is approximately 1 semitone
-
WIDTH: Adjusts the stereo width of the pitch modulation, where higher settings vary the pitch more on one side of the stereo field than the other
4.7 STUDIO Tremolo
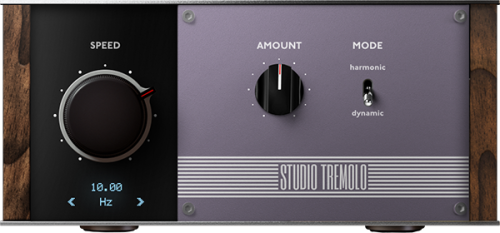
Fusing Dynamic or Harmonic operation with every must-have control you demand, the STUDIO Tremolo is perfect for adding everything from 60’s surf-fuelled vibe to a hard cutting effect giving edge and definition to sustained chords. For comprehensive control, the speed of the STUDIO Tremolo can be adjusted manually or sync’ed to the RIG tempo.
Within the STUDIO Tremolo, the following parameters are available to configure the Tremolo effect:
-
SPEED: Determines the speed of the modulation in either Hertz or beat subdivisions depending on the mode selected:
-
Hz Mode: Allows manual control of the modulation speed from 0.1Hz to 20Hz
-
Note Mode: Sets the modulation speed to subdivisions of the beat from 1/64 to 8/1
-
Dot Mode: Sets the modulation speed to dotted subdivisions of the beat from 1/64d to 8/1d
-
Trip Mode: Sets the modulation speed to triplet subdivisions of the beat from 1/64t to 8/1t
-
-
AMOUNT: Sets the scale of the modulation, with higher settings modulating the volume or harmonic content over a greater range
-
MODE: There are two principal modes of operation available:
-
Harmonic: Provides modulation of harmonic distortion within the processed signal
-
Dynamic: Provides modulation of volume only
-
4.8 STUDIO Phaser
Featuring selectable 6-stage operation and every mainstay demanded from a studio-grade phaser, the STUDIO Phaser component delivers everything from a subtle enhancing drift to a full-throttle ultra-wide stereo lead that guarantees a veritable fog of distinction.
Within the STUDIO Phaser, the following parameters are available to configure the Phaser effect:.
-
SPEED: Determines the speed of the modulation in either Hertz or beat subdivisions, depending on the mode selected:
-
Hz Mode: Allows manual control of the modulation speed from 0.03Hz to 10Hz
-
Note Mode: Sets the modulation speed to subdivisions of the beat from 1/64 to 8/1
-
Dot Mode: Sets the modulation speed to dotted subdivisions of the beat from 1/64d to 8/1d
-
Trip Mode: Sets the modulation speed to triplet subdivisions of the beat from 1/64t to 8/1t
-
-
FEEDBACK: Sets the ‘Regeneration’ amount that adds resonance to the modulated signal
-
DRY / WET: Controls the volume of the modulated signal relative to the input signal
-
AMOUNT: Sets the scale of the modulation, with higher settings sweeping the phaser over a greater range
-
WIDTH: Adjusts the stereo width of the phasing effect
-
COLOR: Sets the center tone of the modulation, adjusting the frequency range over which the phaser is active
-
STAGES: Sets the number of phasing stages from 1 to 6
4.9 STUDIO Flanger
From a mix-ready stereo sweetening effect brimming with subtle modulations to the most contemporary extreme flanging effects, the STUDIO Flanger with its raft of essential controls delivers on any – and every Flanger-centric need.
Within the STUDIO Flanger, the following parameters are available to configure the Flanging effect:.
-
SPEED: Determines the speed of the modulation in either Hertz or beat subdivisions, depending on the mode selected:
-
Hz Mode: Allows manual control of the modulation speed from 0.03Hz to 10Hz
-
Note Mode: Sets the modulation speed to subdivisions of the beat from 1/64 to 8/1
-
Dot Mode: Sets the modulation speed to dotted subdivisions of the beat from 1/64d to 8/1d
-
Trip Mode: Sets the modulation speed to triplet subdivisions of the beat from 1/64t to 8/1t
-
-
FEEDBACK: Sets the ‘Regeneration’ amount that adds resonance to the modulated signal
-
SYNC / OPPOSITE: Sets the Stereo operation mode of the STUDIO Flanger:
-
SYNC Mode: Both left and right channels sweep up and down together
-
OPPOSITE Mode: One Stereo Channel sweeps up when the other Channel sweeps down
-
-
DRY / WET: Controls the volume of the Flanger effect relative to the input signal
-
AMOUNT: Sets the scale of the modulation, with higher settings sweeping the flanger over a greater range
-
WIDTH: Adjusts the stereo width of the Flanging effect
-
COLOR: Sets the center tone of the modulation, adjusting the frequency range over which the Flanger is active
4.10 TSM™ Power Amp
GENOME’s Tube Stage Modelling Power (TSM™) Amplifier component is a pro-grade customisable power amplifier emulation. Using our proprietary TSM™ technology, dive in and sculpt your tone with 4 separate tube models (6L6, EL34, EL84 and KT88) in Push- Pull / AB class, or Single Ended / A class configurations. In a nutshell, it’s everything you need to tweak to your heart’s content and enrich your tone with the undeniable mojo of an authentic clipping/compressed power section.
Note: The TSM™ Power Amp component does not feature a preamp or tone stack, and as such should be placed post a suitable preamp component or DI feed for optimal results.
Within the TSM™ Power Amp, the following parameters are available to configure the Power Amp Emulation:
-
TUBE MODEL: Choose between 6L6, EL34, EL84 & KT88 Tube Models
-
DEPTH: Increasing this control adds more low frequency content to the POWERAMP stage
-
CONTOUR: Low values result in reduced bass and treble frequency content creating a more ‘mid-focussed’ tone; higher settings will increase the bass and treble frequency content while reducing mid-range frequencies resulting in a more ‘scooped’ sound
-
VOLUME: Sets the tube output stage volume. As well as increasing the output volume, higher settings will also drive the output more, increasing the amount of POWERAMP distortion
-
Tube Configuration: Select whether the selected Tube Model is configured in SINGLE-ENDED or PUSH-PULL states
-
Tube Type: Define whether the Tube model is a TRIODE- or PENTODE-centric emulation
Note: In the preset browser section, clicking the three dots on the right hand side of the pane provides options for the TSM™ Power Amp’s Processing Mode. This feature is principally included for preset compatibility with Wall Of Sound; the Wall Of Sound option will switch the Power Amp component into a legacy mode, faithfully replicating the tonality and control specification of the Power Amp component included in Two notes’ Wall of Sound plugin. When the GENOME mode is instantiated, expect an updated tonal output when adjusting DEPTH, CONTOUR and VOLUME parameters.
4.11 CODEX
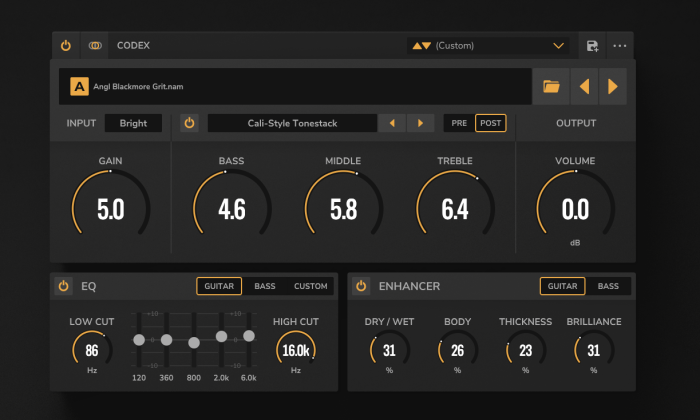
CODEX is a next-gen unification engine, primed to unleash the full-potential of your AI-powered amp & pedal capture arsenal. Featuring complete-compatibility with Neural Amp Modeller (NAM), AIDA-X and Proteus / Proteus Knob captures captures, CODEX delivers a suite of custom-engineered FX to surgically adapt and reimagine any static AI model to your exacting needs.
Within CODEX, the following parameters are available to configure the component:
-
Input Source Configuration: Use this drop-down selector to determine whether CODEX is fed by a Stereo or Mono source; the following options are available:
-
Stereo: In this instance, CODEX is fed with a Stereo Signal and will always process two channels of audio; note that this will effectively increase the host machine’s CPU load and should only be used when front-loading CODEX with Stereo effects and processors
-
Mono LR Mix: In this instance both channels of the Stereo Signal are summed to a Mono Signal
-
Mono from Left: In this instance CODEX processes the left channel of the Stereo Signal only
-
Mono from Right: In this instance CODEX processes the right channel of the Stereo Signal only
-
-
File Browser: Use the File Browser to select the folder on your computer’s file system where your compatible AI Amp and Pedal capture files are stored: click the Folder icon, navigate to the desired folder on your host machine’s hard-drive and select a compatible file. Once a folder has been selected, the left/right buttons will cycle through the AI Amp and Pedal capture files stored in that folder. The name of the currently loaded AI Amp and Pedal capture is displayed in the File Name Text Box located at the top left of the GUI. Clicking the File Name Text Box will open a drop-down menu where individual AI Amp and Pedal capture profiles can be selected and loaded.
-
INPUT Section: When configuring the input stage of CODEX, the following controls are available:
-
Input Voicing: A fixed EQ setting to optimize the input to the AI Amp and Pedal capture profile – available options include WARM, NEUTRAL and BRIGHT. This control offers a fast and effective solution to the common pitfall of amp sims often sounding too muddy or too harsh depending on the personal taste of the player. Comprising a simple 2 band EQ + gain compensation, the selected input voicing ensures AI Amp and Pedal capture profiles react in accordance with what the guitar player generally enjoys in terms of tightness/fullness
-
GAIN: Adjusts the input gain to the AI Amp and Pedal capture, affecting the volume and subsequent drive of the instantiated profile
-
Note: The range of the GAIN control varies depending on the compatible file format loaded. This has been configured to ensure optimal sound for the capture profile instantiated and maintain an input signal within an ideal range
-
-
-
TONESTACK: CODEX’s TONESTACK emulates a variety of real-world Tone Stacks modeled from classic amplifier tone circuits. Depending on the TONESTACK selected, up to four EQ-centric Tone Stack controls operate at different frequencies. When configuring CODEX’s TONESTACK, the following controls are available:
-
Off/On Switch: Accessible via the top left corner of the TONESTACK section to bypass/engage the TONESTACK processing
-
Tonestack Type: Use this selection box to determine the TONESTACK model to add to the AI Amp and Pedal capture
-
PRE/POST: Use this to position the selected TONESTACK at different points in the signal chain:
-
If PRE is selected, the routing is configured as follows: Input Signal > TONESTACK > Gain > Input Voicing > Amp Model > Output > EQ > Enhancer
-
If POST is selected, the routing is configured as follows: Input Signal > Gain > Input Voicing > Amp Model > TONESTACK > Output > EQ > Enhancer
-
-
BASS: Use this control to attenuate or boost the Bass frequency content of your signal of the instantiated AI Amp or Pedal capture profile
-
MID: Use this control to attenuate or boost the Mid-Range frequency content of your signal of the instantiated AI Amp or Pedal capture profile
-
TREBLE: Use this control to attenuate or boost the Treble frequency content of your signal of the instantiated AI Amp or Pedal capture profile
-
Note: If a TONESTACK type features a different number of tone controls than those listed above, only those controls will be visible and labeled accordingly
-
-
OUTPUT Section: The following controls are available:
-
VOLUME: Adjusts the OUTPUT VOLUME of the instantiated AI Amp or Pedal capture profile
-
EQ Section: Use the 5-band Graphic Equalizer to further refine the instantiated AI Amp or Pedal capture profile. Within the Graphic Equalizer, the following controls are available:
-
Off/On Switch: Located in the top left corner of the EQ section, this can be used to bypass/engage the EQ section.
-
EQ Controls:
-
GUITAR/BASS/CUSTOM Mode: Choosing GUITAR or BASS mode selects fixed frequency bands optimized for guitar or bass respectively; selecting CUSTOM allows the user to manually configure the specified frequencies for each band
-
LOW CUT: Determines the frequency at which the LOW CUT Filter is applied
-
HIGH CUT: Determines the frequency at which the HIGH CUT Filter is applied
-
5-Band Graphic EQ: Depending on the mode chosen, each of the 5 bands operates at a particular frequency, with a range of +/-20dB
-
In GUITAR Mode: The frequencies are fixed at 120Hz, 360Hz, 800Hz, 2kHz and 6kHz
-
In BASS Mode: The frequencies are fixed at 50Hz, 120Hz, 360Hz, 800Hz and 4kHz
-
In CUSTOM Mode: The frequency of each band can be adjusted using the dedicated FREQUENCY controls that appear below the vertical sliders
-
-
-
-
-
ENHANCER: CODEX’s ENHANCER is a tone-shaping tool that can be used to boost the signal-content of the AI Amp or Pedal capture profile via three pre-designated frequency bands – low, mid and high. This works somewhat like an EQ, but adds a degree of compression to each of the aforementioned bands. The ENHANCER is placed at the end of the signal chain and features the following controls to refine the output of the instatied AI Amp or Pedal capture profile:
-
Off/On Switch: Located in the top left corner of the ENHANCER section, use this to bypass/engage the ENHANCER
-
ENHANCER Controls:
-
GUITAR/BASS: Switch to select whether the ENHANCER’s Frequency Bands are optimized for Guitar or Bass
-
DRY / WET: Sets the volume of the affected signal relative to the input signal
-
BODY: Sets the amount of processing applied by the ENHANCER to the mid-range frequency content
-
THICKNESS: Sets the amount of processing applied by the ENHANCER to the low-end frequency content
-
BRILLIANCE: Sets the amount of processing applied by the ENHANCER to the high-end frequency content
-
-
4.11.1 Securing additional CODEX Captures
CODEX is compatible with Neural Amp Modeller (NAM), AIDA-X and Proteus captures. We’d like to take this opportunity to thank the teams at Mod Audio, Guitar ML, Amalgam Audio and Tone Hunt veteran Arlington Audio / Nathan Mesiti for supplying our stock captures! Need more captures? We’ve included some quick links below for your perusal:
Neural Amp Modeller (NAM)
-
Get more information on NAM: https://www.neuralampmodeler.com/
-
Discover ToneHunt: https://tonehunt.org/
-
Check out Nathan Mesiti’s Captures: https://tonehunt.org/ArlingtonAudio
Mod Audio / AIDA-X
-
Get more information on AIDA-X: https://aida-x.cc/
Guitar ML / Proteus:
-
Get more information on Proteus: https://guitarml.com/
-
Go Support Proteus: https://www.patreon.com/GuitarML
-
Follow Proteus: https://www.youtube.com/@GuitarML
Amalgam Audio:
-
Get more information on Amalgam Audio: https://www.amalgamcaptures.com/
4.12 STUDIO EQ
Featuring up-to 16 bands of operation, an intuitive layout complete with a visual analysis engine, band-isolate functionality and every main-stay control you would expect from a pro-grade parametric equalizer, the STUDIO EQ covers all your creative and corrective needs, whether it’s the all-important mixdown or honing the perfect live tone.
The STUDIO EQ is divided into 2 principal sections:
-
The Graphical User Interface featuring an editable EQ curve defined per instantiated band and backed by a visual analysis engine
-
The Control Pane featuring parameters to add / remove bands and dedicated controls to surgically configure each EQ band
Top Tip: Many of the controls in the Control Pane of the STUDIO EQ can also be adjusted by clicking on the EQ nodes in the Graphical User Interface.
Within the STUDIO EQ, the following configuration options are available:
Adding or Removing EQ Bands:
-
In the Control Pane, a band can be added using the ‘+’ button, and deleted using the ‘X’ button
-
In the Graphical User Interface, a band can be added by double-clicking and deleted by double-clicking the EQ node while holding the CTRL Key (PC) or CMD Key (MAC)
Selecting EQ Bands:
-
In the Control Pane, a band can be selected by using the left/right arrows to cycle through the instantiated bands, or by clicking on the Band Number and using the related drop-down menu
-
In the Graphical User Interface, a band can be selected by clicking on the desired EQ node
Enabling/Disabling EQ Bands:
-
In the Control Pane, a band can be enabled or disabled using the On/Off button located in the bottom left of the pane
-
In the Graphical User Interface, a band can be enabled or disabled by double-clicking on the EQ node
EQ TYPE:
-
To change the EQ type for a specific band, click in the EQ type box located in the Control Pane and select the desired band from the resultant drop-down menu
-
The available EQ types include: Peak, Notch, Low-Cut, High-Cut, Band-Pass, Low-Shelf & High-Shelf
-
GAIN:
-
The GAIN applied to each band can be adjusted in either the Control Pane, or by clicking and dragging each EQ node up or down within the Graphical User Interface
-
The GAIN parameter is only active on the following EQ types: Peak, Low-Shelf, High-Shelf
-
To ensure only GAIN is altered and not the frequency setting of the selected node, hold CTRL (PC) or CMD (MAC) whilst dragging the related node
FREQUENCY:
-
The center frequency of each band can be adjusted in the Control Pane or by clicking and dragging each EQ node left or right within the Graphical User Interface
-
To ensure only FREQUENCY is altered and not the GAIN of the selected node, hold ALT (PC) / Option (MAC) whilst dragging
Q
-
The Q factor, or ‘width’ of each node’s band can be adjusted in the Control Pane
-
Note: Q values are centered around 0.707 but ranges have been tweaked for each EQ type to be musically pleasing; as such, duplicating settings from another EQ plug-in may not garner desired results
-
SLOPE
-
The SLOPE of the selected band can be adjusted via the dedicated control located within the right hand side of the Control Pane; use either the left/right arrows or click the SLOPE text box to reveal the related drop-down menu
-
In most instances, SLOPE affects the ‘order’ (or ‘steepness’) of the band from the center frequency
-
Note: When using the Peak EQ TYPE, a SLOPE value other than 12dB/oct will transform the Peak EQ TYPE into a Band-Shelf EQ TYPE; in this instance, the Q parameter will control the bandwidth of the Band Shelf
-
4.13 STUDIO Compressor
When it comes to surgical dynamic control, a full-featured Compressor is a certified must-have. Complete with every mainstay control demanded from a pro-grade compressor – plus lookahead and an ultra-intuitive visual analysis engine – the STUDIO Compressor is a one-stop-shop when it comes to complete control over your source signal’s dynamic content.
Within the STUDIO Compressor, the following parameters are available to configure the component:
-
ATTACK: Sets the attack time from 1ms to 200ms
-
RELEASE: Sets the release time from 10ms to 500ms
-
KNEE: Sets the sharpness of the compression curve. A “Soft” KNEE will react to lower signal levels in and around the THRESHOLD level to a moderate degree, whereas a “Hard” KNEE will only ever compress signal levels above the THRESHOLD
-
Note: This setting can also be controlled using the horizontal handles located in the Compression Curve Graphic
-
-
RATIO: Sets the compression ratio from 1:1 (no compression) to 100:1 (limiting). This setting can also be controlled using the rightmost handle in the Compression Curve Graphic
-
THRESHOLD: Sets the input level in dB required to trigger compression. This setting can also be controlled using the central handle in the Compression Curve Graphic
-
MAKE-UP: Sets a level of Gain make-up to compensate for level reduction caused by the component’s compression amount
-
HP FILTER: Sets the STUDIO Compressor’s Sidechain High-Pass frequency in Hz. Frequencies below this value will not trigger compression
-
LOOKAHEAD: Sets the LOOKAHEAD from 0ms to 10ms. This parameter forward-analyses signal content resulting in quicker reaction to peaks in the audio signal
-
Note: Using LOOKAHEAD will add latency equal to the lookahead time
-
-
DRY / WET: Controls the volume of the compressed signal relative to the input signal, ideal for implementing ‘parallel compression’ techniques
-
UNLINKED/LINKED: Use these options to determine how the STUDIO Compressor reacts to Stereo Signals:
-
LINKED: Maintains compression for both Left and Right channels regardless of differentials between each channel within the Stereo signal
-
UNLINKED: Configures the STUDIO Compressor to compress Left and Right channels separately and independently
-
-
PEAK/RMS: Determines the mode for the STUDIO Compressor’s signal detection:
-
PEAK: The compressor will be configured to engage on shorter peaks
-
RMS: The compressor will be configured to engage based on an averaged input signal over time
-
4.14 STUDIO Enhancer
When it comes to tone, primo dynamic- and tone-shaping tools are a certified must-have. Enter GENOME’s STUDIO Enhancer. Complete with ‘Thickness’ and ‘Brilliance’ controls to emphasize the low- and high-end sonic content of your DI signal respectively – plus a super-handy ‘Body’ encoder to dial in a fuller, more present tone – and all rudiments are well-and-truly set to push meteoric sonics whatever your next performance demands.
Within the STUDIO Enhancer, the following parameters are available to configure the component:
-
DRY / WET: Sets the volume of the affected signal relative to the input signal
-
BODY: Determines the mid-range frequency enhancement amount
-
THICKNESS: Determines the low-end frequency enhancement amount
-
BRILLIANCE: Determines the high-end frequency enhancement amount
-
OFF/ON: Sets whether the component is bypassed or engaged
-
GUITAR/BASS: Determines whether the frequencies affected are optimized for guitar or bass respectively
4.15 STUDIO Twin Tracker
Seeking a radical stereo makeover? Meet GENOME’s TWIN TRACKER – a cutting-edge stereo double tracking wunderkind. Simply fire-it-up to create a proxy – or ‘Virtual Guitarist’ – on the right channel in real-time!
Note: The STUDIO Twin Tracker component will always sum the input to mono, even if it is fed with a stereo signal.
Within the STUDIO Twin Tracker, the following parameters are available to configure the component:
-
BALANCE: Determines the position of the affected and source signal within the stereo field
-
TIGHTNESS: Controls the level of synchronization/drift of the proxy as well as width of the source- and affected-signal within the Stereo field; higher values for this parameter result in a more extreme double-tracking effect
-
OFF/ON: Sets whether the component is bypassed or engaged
4.16 STUDIO Exciter
Looking to add some low end definition or top-end sizzle to your tone? The STUDIO Exciter is just what the doctor ordered. Fusing a fuss-free interface and an expertly-tuned algorithm, the STUDIO Exciter guarantees to get your tone where you need it fast. The result? You spend less time tweaking and more time on the important business of playing!
Note: The STUDIO Exciter operates somewhat like an EQ; however, instead of boosting frequencies, it adds harmonic content relative to the original signal to predesignated processing bands.
Within the STUDIO Exciter, the following parameters are available to configure the component:
-
LOW: Sets the low frequency excitation amount
-
HIGH: Sets the high frequency excitation amount
-
OUT: Sets whether the component is bypassed or engaged
4.17 Wall of Sound Post FX
For our legion of Wall of Sound users, we’ve engineered a specific component that replicates the Post FX suite included in industry standard poweramp modelling, cabinet emulation and virtual mic’ing plugin.
Note: Presets created in Wall of Sound can be imported into GENOME. Preset import is limited in that only the first two DynIR Virtual Cabinets used in the target Wall of Sound preset will be ported into the respective GENOME preset. Upon importing the Wall of Sound preset, multiple qualifying component blocks will be added to the GENOME RIG to recreate the complete Wall of Sound preset.
EQ Section
The Wall of Sound Post FX Component features a Graphic Equalizer to refine your tone by increasing/decreasing the level of specific pre-defined frequencies. Within the Graphic Equalizer, the following controls are available:
-
Off/On Switch: This can be used to Bypass/Engage the EQ section
-
GUITAR/BASS/CUSTOM Mode: Choosing the GUITAR or BASS Mode selects fixed frequency bands optimized for guitar or bass respectively. Selecting the CUSTOM Mode allows the user to manually configure the specified frequencies for each band. Each Mode features a HIGH CUT filter that can be adjusted to remove all frequencies below the HIGH CUT filter frequency. Depending on the Mode selected, each of the bands operates at a particular frequency, with a range of +/-20dB; Each frequency band can also be bypassed/enabled using the Off/On buttons above each band slider:
-
In GUITAR Mode: The band frequencies are fixed at 120Hz, 360Hz, 800Hz, 2kHz and 6kHz. The HIGH CUT can be set between 10Hz and 500Hz
-
In BASS Mode: The band frequencies are fixed at 50Hz, 120Hz, 360Hz, 800Hz and 4kHz. The HIGH CUT can be set between 10Hz and 500Hz
-
In CUSTOM Mode: The Frequency and Q (or ‘bandwidth’) of each band can be adjusted using the dedicated FREQUENCY and WIDTH controls visible below the vertical sliders. An additional high frequency band is available in CUSTOM Mode, and the lowest and highest bands are configurable for EQ TYPE:
-
LOW BAND: Select between Low Shelf, Peak & High Pass (or ‘Low Cut’), and adjust the frequency between 10Hz and 500Hz
-
HIGH BAND: Select between High Shelf, Peak & Low Pass (or ‘High Cut’), and adjust the frequency between 1kHz and 20kHz.
-
-
EXCITER Section
The Wall of Sound Post FX EXCITER operates somewhat like an EQ; however, instead of boosting frequencies, it adds harmonic content relative to the original signal to predesignated processing bands.
Within the EXCITER, the following parameters are available to configure the component:
-
Off/On Switch: Sets whether the EXCITER Section is bypassed or engaged
-
LOW: Sets the low frequency excitation amount
-
HIGH: Sets the high frequency excitation amount
COMPRESSOR Section
The Wall of Sound Post FX COMPRESSOR can be used to control the dynamics of the processed signal, reducing peaks and scaling the source signal’s dynamic range. A Gain Reduction Meter denotes how much compression is being applied to the signal in real time. The following controls are available to configure the Wall of Sound Post FX COMPRESSOR:
-
Off/On Switch: Sets whether the COMPRESSOR Section is bypassed or engaged
-
THRESHOLD: Sets the input level in dB required to trigger compression
-
RATIO: Sets the compression ratio from 1:1 (no compression) to 20:1
-
ATTACK: Sets the attack time from 0ms to 200ms
-
RELEASE: Sets the release time from 10ms to 500ms
-
MAKE-UP: Sets a level of Gain Make-Up to compensate for level reduction caused by the component’s compression amount
REVERB Section
The Wall of Sound Post FX REVERB provides a quick means to simulate various rooms and spaces. Configuring the Reverb is actioned using the following parameters:
-
Off/On Switch: Sets whether the REVERB Section is bypassed or engaged
-
Room Type: Provides a drop-down menu to select a preset REVERB ‘Space’; Available options include: Studio A, Studio B, Basement, Loft, Hall A, Hall B, Crypt, Cathedral, or Custom. Selecting one of these preset spaces will adjust the following controls to preset values used to simulate the chosen space:
-
DRY / WET: Controls the volume of the Reverb signal relative to the input signal
-
SIZE: Adjusts the overall Reverb length, with higher values emulating larger spaces
-
ECHO: Adjusts the ‘echo’ effect within the Reverb, simulating reflections from surfaces within the virtual space
-
COLOR: Controls the amount of ‘damping’ within the Reverb space, resulting in spaces with darker or brighter tonal characteristics
-
5. PEDALS
5.1 Dupe Delay
Taking inspiration from the legendary MXR® Carbon Copy, the Dupe Delay is a mono modulated PEDAL component delivering the epitome of a rich bucket-brigade delay brimming with all the warm overtones you demand from such an iconic pedal-board mainstay. Featuring dedicated TIME, DRY/WET and RATE controls – plus a handy MOD re-voicing switch and up to 600 ms of delay time – the Dupe Delay is primed for everything from an expansive Gilmour-inspired wash or a subtle slapback to sit your tone perfectly in any pocket!
Note: The component’s modulation can be switched in or out with the MOD button; when engaged the modulation speed is fixed at 0.15Hz.
Within the Dupe Delay, the following parameters are available to configure the component:
-
DRY / WET: Sets the volume of the delayed signal relative to the input signal
-
TIME: Determines the time between delay repeats; the range is 10ms to 600ms
-
FEEDBACK: Controls the quantity of delay repeats (‘regeneration’ amount)
-
MOD: A switch that engages pitch modulation of the delayed signal
-
EFFECT: On/Off control that engages or bypasses the component
5.2 Big Fuzz
Inspired by the legendary EHX® Big Muff Pi, the Big Fuzz packs BIG tone shaping potential with its rich, buttery, string-esc sustain, complete with all the spit and life-like fuzz your performance demands. With dedicated controls for Volume, Tone and Sustain/Distortion amount, everything from a subtle muted saturation to a full-throttle balls-to-the-wall Fuzz-fuelled onslaught is ripe for the taking!
Within the Big Fuzz, the following parameters are available to configure the component:
-
VOLUME: Sets the output volume of the effect
-
TONE: Sets the tone of the fuzz from dull to bright
-
SUSTAIN: Sets the amount of distortion generated
5.3 9-Phase
Inspired by the MXR® Phase 90, this component delivers an iconic tone incarnate – tone (we might add) that’s been a mainstay on the boards for legends for over 4 decades! More often than not, simplicity is often the spark for the greatest creative exploits; following this ethos, the 9-Phase delivers single knob control taking your tone from a nuanced phased shimmer to a meteoric cosmic swoosh and everywhere in between. In short, if you’re in the market for a fuss-free Phaser that continues to define – and redefine – the sound of generations of musicians, the 9-Phase is a certified must-have!
Within the 9-Phase, the following parameter is available to configure the component:
-
SPEED: Sets the speed of the phasing effect from slow and subtle to fast and swooshing
5.4 Green Meanie
Inspired by the iconic Ibanez® TS9 Tube Screamer, the Green Meanie delivers the same mid-range hump, next-level dynamic response and sublime drive that’s perfect for front-loading an amplifier and cutting your tone through any mix!
Within the Green Meanie, the following parameters are available to configure the component:
-
DRIVE: Sets the amount of overdrive generated
-
TONE: Sets the tone of the overdrive from dull to bright
-
LEVEL: Sets the output volume of the effect
5.5 Klonataur
Taking inspiration from the iconic and much-revered Klon® Centaur, the Klonataur delivers the same expansive tone with notes akin to tube clipping – all underpinned with the richness and dynamics that made the Centaur so popular with pedal aficionados. At low gain, prepare yourself for a semi-transparent boost with a touch of breakup; push the gain, and enter a world of pure hard-clipped distortion – all blended to perfection with your clean, unaffected signal and brimming with harmonically-rich saturation in all the right places!
Within the Klonataur, the following parameters are available to configure the component:
-
GAIN: Sets the amount of overdrive generated
-
TREBLE: Sets the tone of the overdrive from dull to bright
-
OUTPUT: Sets the output volume of the effect
5.6 RaunchMaker
Inspired by the original Marshall® Blues Breaker, the RaunchMaker delivers the same buttery smooth tone, warmth and full-bodied harmonic saturation to deliver the pinnacle in expressive tone shaping. Inspired by the amp and sultry sonics of the one-and-only Eric Clapton, the RaunchMaker is primed for frontloading CODEX or our TSM Amplifiers for next-level bluesy leads, complete with all clarity and sparkle your performance demands.
Within the RaunchMaker, the following parameters are available to configure the component:
-
GAIN: Sets the amount of overdrive generated
-
TONE: Sets the tone of the overdrive from dull to bright
-
VOLUME: Sets the output volume of the effect
5.7 Vermin
inspired by the ProCo® RAT, Vermin redefines any expectations of what a versatile distortion pedal should be. Whether it’s a primary distortion for an expansive high-gain onslaught, a “dirty channel” supplement for your existing amp rig, or simply a flavor-packed boost, Vermin delivers on all mandates. Plus, with an onboard FILTER control, taming any nuisance high frequency content to sit your tone in any pocket couldn’t be simpler!
Within the Vermin, the following parameters are available to configure the component:
-
DISTORTION: Sets the amount of distortion generated
-
FILTER: Sets the tone of the distortion from bright to dull
-
VOLUME: Sets the output volume of the effect
5.8 Ultra Drive
Taking inspiration from the 1981-born Boss® SD-1 Super Overdrive, the Ultra Drive faithfully reproduces the classic asymmetrical clipping circuit for iconic tube-like overdriven sonics. Perfect for front-loading clean and saturated amps alike, the Ultra Drive’s mild-to-moderate drive – complete with a cutting mid-range and a super-tight low-end – is primed for everything from overdriven bluesy raunch or a searing lead tone that cuts through any mix! High gain aficionados, don’t think of the Ultra Drive as a one-trick-pony! It’s perfect for adding clarity, bite and tightness to even the most gain-fuelled amp!
Within the Ultra Drive, the following parameters are available to configure the component:
-
LEVEL: Sets the output volume of the effect
-
DRIVE: Sets the amount of overdrive generated
-
TONE: Sets the tone of the overdrive from dull to bright
5.9 D-250
Inspired by the 70’s-born DOD® Overdrive Preamp 250, the D-250 replicates every subtlety of the period-authentic LM741 OpAmp, covering everything from a transparent boost to a gritty full-throttle saturated distortion. Whether it’s some authentic 70’s driven mojo, or a distinctive OD-Boost that’s perfect for revoicing your amplifier on-the-fly, the D-250’s simplified control layout guarantees to get your tone where it needs to be fast!
Within the D-250, the following parameters are available to configure the component:
-
GAIN: Sets the amount of overdrive generated
-
LEVEL: Sets the output volume of the effect
5.10 Bass-Q
Every pedal enthusiast knows, no board would be complete with a graphic-style EQ. That’s why GENOME ships as standard with Bass-Q, a 7-band graphic EQ, spec’d to dial in the perfect pre-amplifier bass EQ in a snap!
Within the Bass-Q, the following parameters are available to configure the component:
-
BANDS: Each band features +/-15dB of gain, and the effect can be bypassed/enabled using the GUI footswitch; the bands are set at 50Hz, 120Hz, 400Hz, 500Hz, 800Hz, 4.5kHz, 10kHz
5.11 Guitar-Q
Every pedal enthusiast knows, no board would be complete with a graphic-style EQ. That’s why GENOME ships as standard with Guitar-Q, a 7-band graphic EQ, spec’d to dial in the perfect pre-amplifier Guitar EQ in a snap!
Within the Guitar-Q, the following parameters are available to configure the component:
-
BANDS: Each band features +/-15dB of gain, and the effect can be bypassed/enabled using the GUI footswitch; the bands are set at octave intervals of 100Hz, 200Hz, 400Hz, 800Hz, 1.6kHz, 3.2kHz, 6.4kHz.
5.12 V-1
Looking for expert level volume control, the V-1 is the answer! Complete with Heel and Toe scaling, it’s primed to give you immediate control whenever and wherever you need it!
Note: This Component is primed for use alongside GENOME’s assignable Automation functionality, specifically for real-time control over the volume of the signal wherever V-1 is placed GENOME’s Lane architecture.
Within the V-1, the following controls are available to configure Component:
-
HEEL: Sets the volume in dB when the PEDAL POSITION is set at its lowest value
-
TOE: Sets the volume in dB when the PEDAL POSITION is set at its highest value
-
PEDAL POSITION: Sets the PEDAL’s volume in dB when positioned between the predesignated HEEL and TOE volume settings
-
CURVE TYPE: Selects the volume change CURVE TYPE; available options include LOG (logarithmic) and LINEAR scaling
5.13 WahBaby
Inspired by the infamous Jim Dunlop® Cry Baby, WahBaby delivers all the Wah-tastic tone akin to this certified legend in the pedal annals, all enhanced with a smattering of handy performance customisations thrown-in for good measure.
Within WahBaby, the following controls are available to configure Component:
-
HEEL: Sets the frequency in Hz when the PEDAL POSITION is set at its lowest value
-
TOE: Sets the frequency in Hz when the PEDAL POSITION is set at its highest value
-
PEDAL POSITION: Sets the PEDAL’s Frequency in Hz when positioned between the predesignated HEEL and TOE volume settings
-
BYPASS MODE: Sets the Bypass behavior for the PEDAL with options for:
-
No Bypass: WahBaby is never bypassed regardless of Heel or Toe Pedal Position
-
Heel Off: WahBaby is bypassed when the Pedal Position is set to full Heel
-
Toe Off: WahBaby is bypassed when the Pedal Position is set to full Toe
-
5.14 Saber
Looking for some pre-amplifier PEDAL format tone shaping and a boost that guarantees to revoice your TSM Amp or CODEX capture with J3D1-like precision? Well Tone Heads, this is most certainly the droid (ehem.) PEDAL you’ve been looking for! Introducing Saber, a Clean Boost and Tone Shaping component that’s free with GENOME v1.2. Fusing dedicated controls for FORCE (Gain) and DARK/LIGHT (Tone), this aint no trap – on the contrary, it’s primo tone in a snap!
Within Saber the following controls are available to configure Component:
-
FORCE: Sets the level of the clean boost from -18dB to +30dB
-
DARK/LIGHT: Sets the tone of the boosted signal from dark to bright
5.15 Ping Pong Delay
Much like you can’t have Ying without Yang, no one wants Ping without Pong. Enter GENOME’s full-featured Ping Pong Delay, delivering everything you demand from a PEDAL format fuss-free stereo Delay. Front-and-centre, every mainstay delay-centric control you’d expect is here, plus a raft of unique innovations including a “GROOVE” control to switch up the time-relationship between Ping and Pong repeats for next-level creative rhythmic interplay. In short, if you’re seeking the ultimate fuss-free stereo delay, this is one component you will certainly turn to time-and-time again.
Within Ping Pong Delay the following controls are available to configure Component:
-
LOW CUT: Applies a High Pass Filter to the affected signal with a designated range from 10Hz to 5kHz
-
DRY/WET: Controls the volume of the delayed signal relative to the input signal
-
WIDTH: Defines the Stereo Width of the Ping Pong effect
-
FEEDBACK: Controls the number of delay repeats, or the ‘regeneration’ amount
-
HIGH CUT: Applies a Low Pass Filter to the affected signal with a designated range from 100Hz to 20kHz
-
TIME Sets the delay time, either in ms, or subdivisions of the beat, depending on the mode selected:
-
ms Mode: Manually sets the delay time from 1ms – 8000ms
-
Note Mode: Sets the delay time to subdivisions of the beat from 1/64 to 8/1
-
Dot Mode: Sets the delay time to dotted subdivisions of the beat from 1/64d to 8/1d
-
Trip Mode: Sets the delay time to triplet subdivisions of the beat from 1/64t to 8/1t
-
-
GROOVE Adjusts the time-relationship between Ping and Pong repeats for creative rhythmic interplay. The PONG control provides a total of 9 options (inclusive of a standard Ping Pong 1:1 setting) resulting in either the Ping’s or Pong’s relative time relationship being 2, 3, 4 or 8 times shorter than the base tempo (TIME) setting.
-
TAP TIME: When in ms Mode, this can be used to set the delay time manually by tapping at the desired speed
-
EFFECT: Sets whether the component is bypassed or engaged
5.16 NG-1
For those times where you demand complete control over gating in your GENOME RIG, there’s the NG-1 PEDAL Component. This super-handy utility component delivers comprehensive gate facilities, primed for placement anywhere in GENOME’s lane-based architecture. Packing THRESHOLD, HARD/SOFT Modes and a super handy smart LEARN facility, you’re primed with everything you need to banish any nuisance noise for good!
Within NG-1 the following controls are available to configure Component:
-
THRESHOLD: Sets a threshold level under which the NOISE GATE will activate
-
HARD/SOFT: Sets the behavior of the NOISE GATE; HARD will cut the sound abruptly when the NOISE GATE is activated; SOFT apply a gentle roll-off to the gating effect
-
LEARN: Clicking this button will enable the NOISE GATE’s LEARN Mode for automatic THRESHOLD configuration. When LEARN Mode is instantiated, stop playing and mute your strings; GENOME will then calculate the level of the background noise preset in the source signal and set the THRESHOLD accordingly
5.17 ABC Bass Chorus
When you’re in the market for a fuss-free pedal format bass chorus, GENOME’s ABC Bass Chorus PEDAL Component is a one-stop-shop. Taking inspiration from the revered EHX® Bass Clone Chorus, you’re primed with the perfect blend of studio-grade modulated effect processing and a control arsenal developed to get your tone where it needs to be, fast!
Within ABC Bass Chorus the following controls are available to configure Component:
-
AMOUNT:Sets the range of the modulation, with higher settings sweeping the modulation over a greater range
-
RATE: Determines the speed of the modulation
-
X-OVER: Removes the low-end frequency content from the mod circuit and therefore the affected wet signal
-
BASS: Attenuates or boosts all Bass frequency content at the PEDAL Component’s output
-
TREBLE: Attenuates or boosts all Treble frequency content at the PEDAL Component’s output
Automation
Please note, Automation is only available in the Plugin Variants of GENOME when instantiated in a compatible Digital Audio Workstation.
GENOME provides comprehensive tools to configure your automation preferences in production scenarios. Within GENOME there are two categories of Automation Assignments:
-
Hard-coded, non-configurable automation assignments
-
10 User-Configurable Automation Assignments (A1 – A10)
1. Hard Coded Automation Assignments
GENOME features a range of hard-coded automation assignments that are exposed to your Digital Audio Workstation. These cannot be edited and are best considered as Global Assignments. Parameters available in the GENOME’s Hard Coded Automation Assignments include:
-
Input Level
-
Input Gate Enable/Disable
-
Input Gate Threshold
-
Input Gate Soft/Hard
-
Output Level and more.
2. User-Configurable Automation Assignments
GENOME also features 10 user-configurable Automation Assignments allowing you to customize your Automation preferences at a RIG level.
Automation Assignments can be managed in 2 ways.
For assignment of individual parameters to one of the 10 user-configurable slots:
-
Right click any automatable parameter in a selected GENOME component
-
Select “Assign to” and choose an available assignment slot (A1 – A10)
-
Once actioned, this assignment will be exposed to your DAW and you will be able to automate this using your DAW’s internal automation options
Alternatively, the Automation Assign / Unassign Window showcases – and allows management of – all User-Configurable Automation Assignments from A1 – A10 in one convenient window:
-
Click the Automation button within GENOME’s RIG Config pane to bring up the Automation Assign / Unassign window
-
Click the “+” button within an empty Automation Assignment slot from A1 – A10. This highlights in blue all the automatable parameters of the GENOME component you are currently editing / viewing
-
Click the desired parameter to Automate to assign that parameter to the Automation Assignment slot
-
Note: You are free to navigate through effects while staying in this mode
Removing a User-Configurable Automation Assignment
Either right click an assigned parameter and select unassign, or open the Automation assign / unassign window for batch changes by clicking the X icon to terminate related assignments.
Purchasing additional DynIR Virtual Cabinets and GENOME Premium Components
Two notes’ catalog contains an ever-expanding list of Components (DynIRs, PEDALs, AMPS and STUDIO FX). Within GENOME, comprehensive facilities are available to preview and purchase any components not assigned to your Two notes License in real-time within the context of your virtual RIG.
1. AMPS, PEDALS and STUDIO FX
1.1 Identifying AMPS, PEDALS and STUDIO FX Not Assigned to your Two notes Account
Within GENOME’s Component Menu, accessed by clicking on a blank Component Slot, non-owned components are displayed with a cart icon located next to the Component name.
1.2 Previewing AMPS, PEDALS and STUDIO FX in GENOME
In order to preview non-owned AMPS, PEDALS and STUDIO FX in GENOME, simply instantiate the Component from the Component Menu. The Component will subsequently load in Demo mode highlighted by a cart symbol overlaid above the Component name in the lane architecture alongside a GENOME RIG Builder “DEMO” overlay.
1.3 Purchasing AMPS, PEDALS and STUDIO FX in GENOME
2. DynIR Virtual Cabinets
2.1 Identifying DynIR Virtual Cabinets Not Assigned to your Two notes Account
Within GENOME’s DynIR Component, the symbols next to the cabinet’s name distinguish whether a cabinet is owned / assigned to your Two notes license or available for demo / preview.
To view cabinets allocated to your Two notes Account license, simply exit Preview Mode by turning off the Preview symbol (circled in red below); you will notice the number of cabinets available in the DynIR Browser is reduced to only those assigned to your Two notes Account (circled in green below).
2.2 Previewing DynIR Virtual Cabinets in GENOME
To preview a cabinet, simply instantiate the related DynIR. You will notice a message is displayed in the DynIR component window warning that silences are inserted while you play. The preview symbol (circled in red below) is also present in the component block of GENOME’s Lane based architecture to indicate at a quick glance that the cabinet loaded is in Preview Mode.
2.3 Purchasing DynIR Virtual Cabinets in GENOME
Hotkeys & Shortcuts
The Following Hotkeys & Shortcuts are available in GENOME
General
-
Ctrl/CMD + drag – Precision edition of knobs and controls
-
Double Click on Control Label – Reset control to default
FX Chain
-
Ctrl/CMD + drag FX block – Duplicates the FX block to a selected insert
Studio EQ Band Nodes
-
Double Click – Bypass/Enable band
-
Ctrl/CMD + Double click – Delete band
-
Shift + Drag – Locks frequency
-
Alt + Drag – Locks Gain
テクニカルサポート
製品に問題が発生した場合、またはご購入に関する一般的なサポートが必要な場合、Two notesAudio Engineeringはオンラインサービスを提供します。迅速かつ効率的なテクニカルサポートを提供するため、オンラインサービス「Two notesヘルプデスク」をご用意しました。 Help Desk. このヘルプデスクでは、チケットを送信していただくことで、私たちのサポートチームのメンバーが喜んであなたのお問い合わせのお手伝いをさせていただきます。 また、よくある質問や一般的な参考資料については、遠慮なくこちらをご覧ください。 browse the Knowledgebase.
繋がりましょう!
1.トゥーノーツのWEBサイト
Two notes Audio Engineeringの詳細情報をお探しですか? まずはTwo notesのウェブサイトをご覧ください。こちらご覧いただけます: Two notes website.
・会社と製品ポートフォリオに関するニュース
・GENOMEに関する総合的な情報 GENOME
・Firmware & software updatesTwo notes製品ポートフォリオ全体のファームウェアとソフトウェアのアップデート
・ 新しいDynIR™バーチャルキャビネットを購入できるTwo notes Storeへのアクセス
・ 他のトーピドユーザーとヒントやアドバイスを共有できる公式フォーラム
2. 連絡先
是非Facebook、Instagram、Twitterをフォローしてみて下さい。また、フェイスブックのグループもあり、世界中のお客さまが集まってギアやトーンについて語り合っています。ぜひご参加ください! Facebook, Instagram Twitter group on Facebook
3. ニュースレターの登録
Two notesの最新ニュース、リリース、プロモーションの最新情報を入手するには、ニュースレターを購読してください。 here.


